Help Topics
2. Course Builder – Curriculum
3. Course Builder – Additional
4. Quiz Builder
5. AI Studio
Course Builder
4 – Quiz Builder
(Click a link to jump to any section)
Table of Contents
YOUniversity’s Quiz Builder is a powerful tool designed to help you create interactive, engaging quizzes for your students. It offers 8 modern, versatile question types to assess students’ course material understanding effectively. It also offers several customization options to tailor each quiz perfectly to suit your needs.
Quiz Creation
To start creating quizzes, click the ‘+ Quiz‘ button at the bottom of a Topic. You only need one Quiz per Topics as each Quiz can have many Questions. You can create Quizzes for as many Topics as you need.
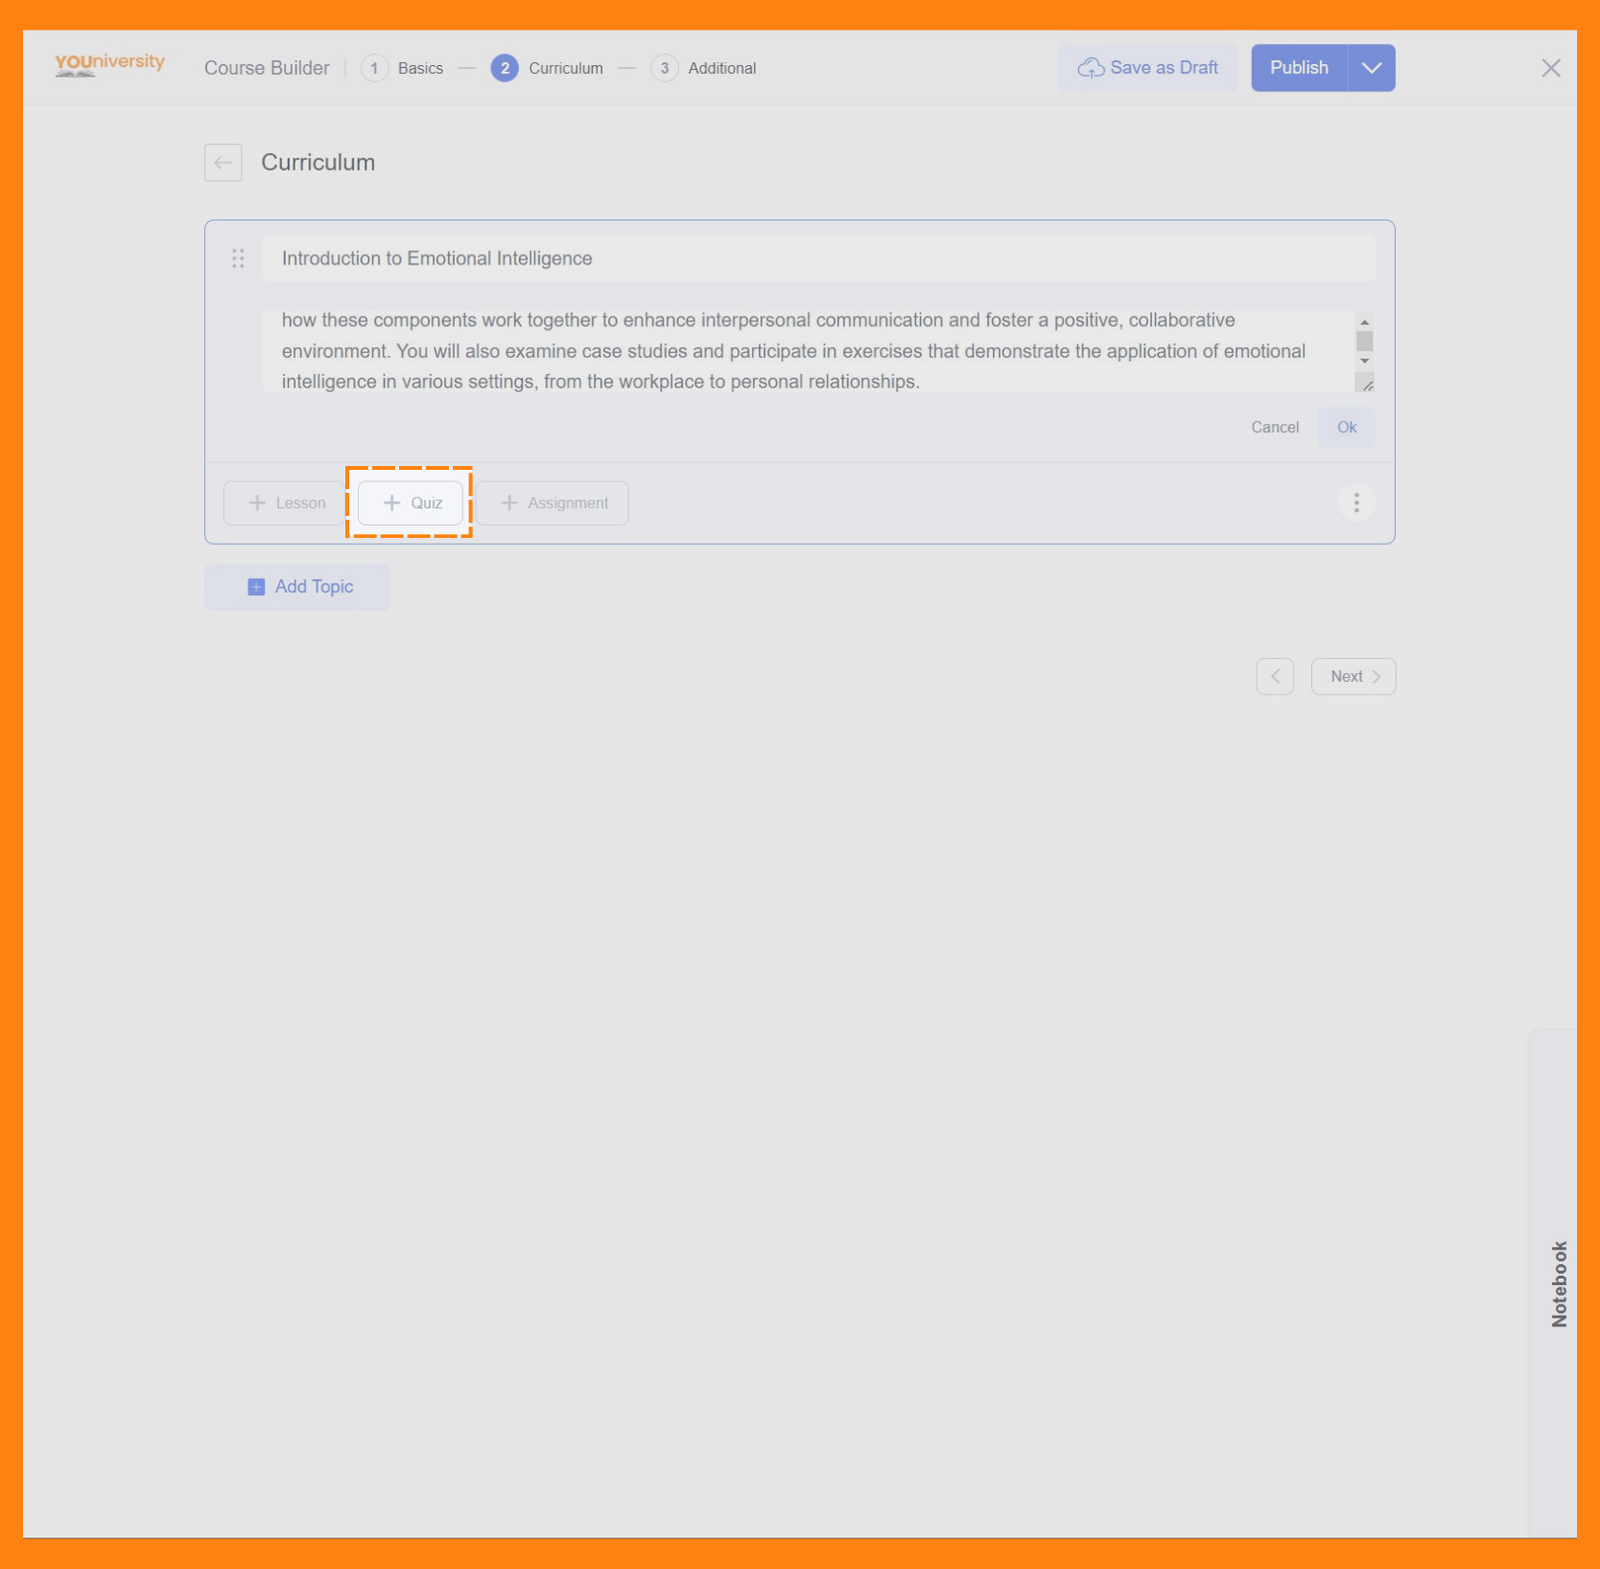
This will open the Quiz Builder window, where you’ll first need to enter the quiz title and description. Once that’s done, you can proceed to creating your quizzes.
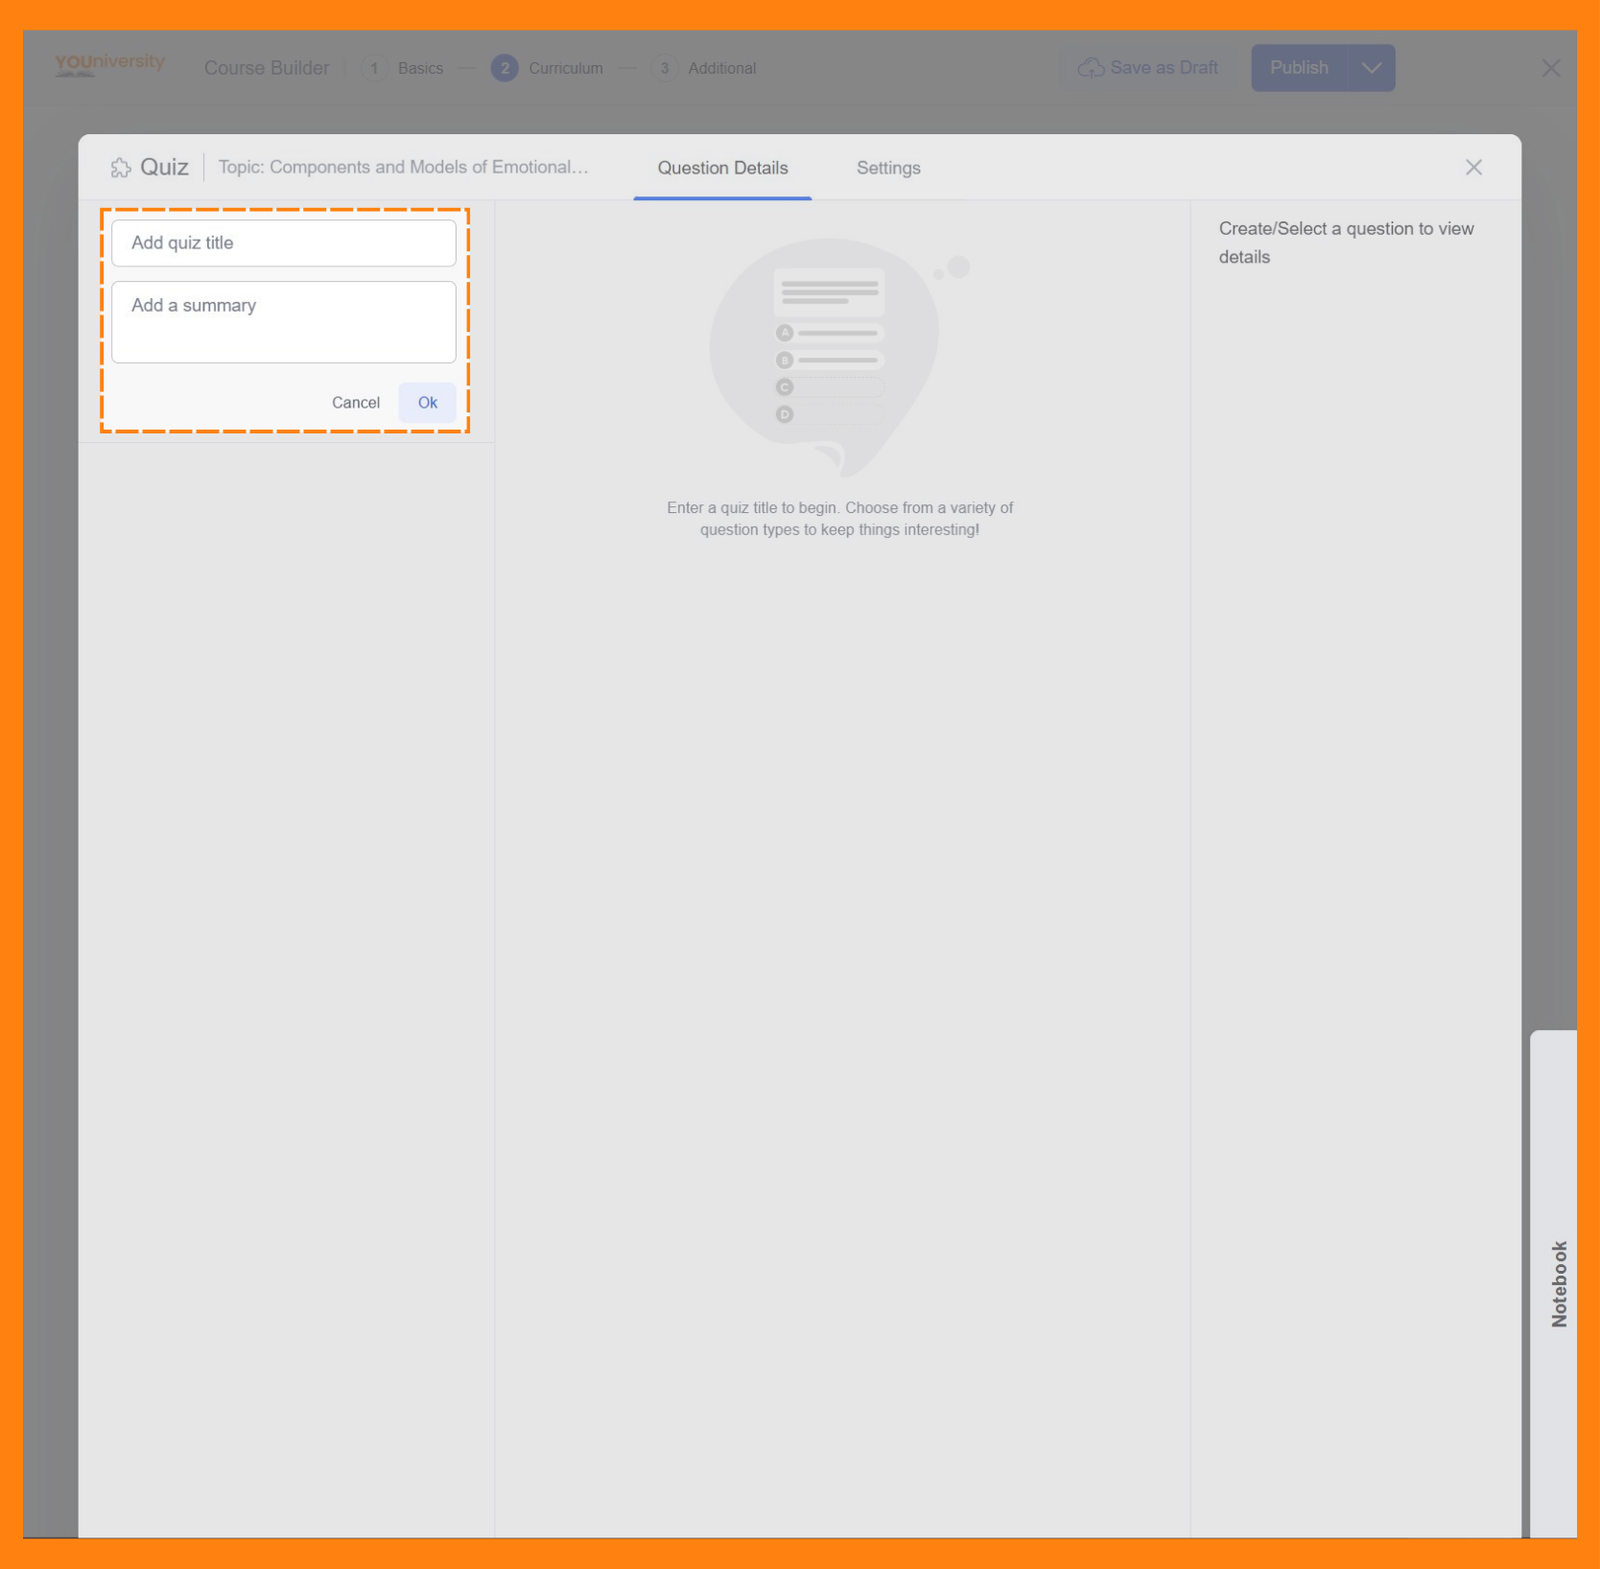
YOUniversity lets you add 8 different types of questions. These are:
- True/False
- Multiple Choice
- Open Ended/Essay
- Fill in the Blanks
- Short Answer
- Matching
- Image Answering
- Ordering
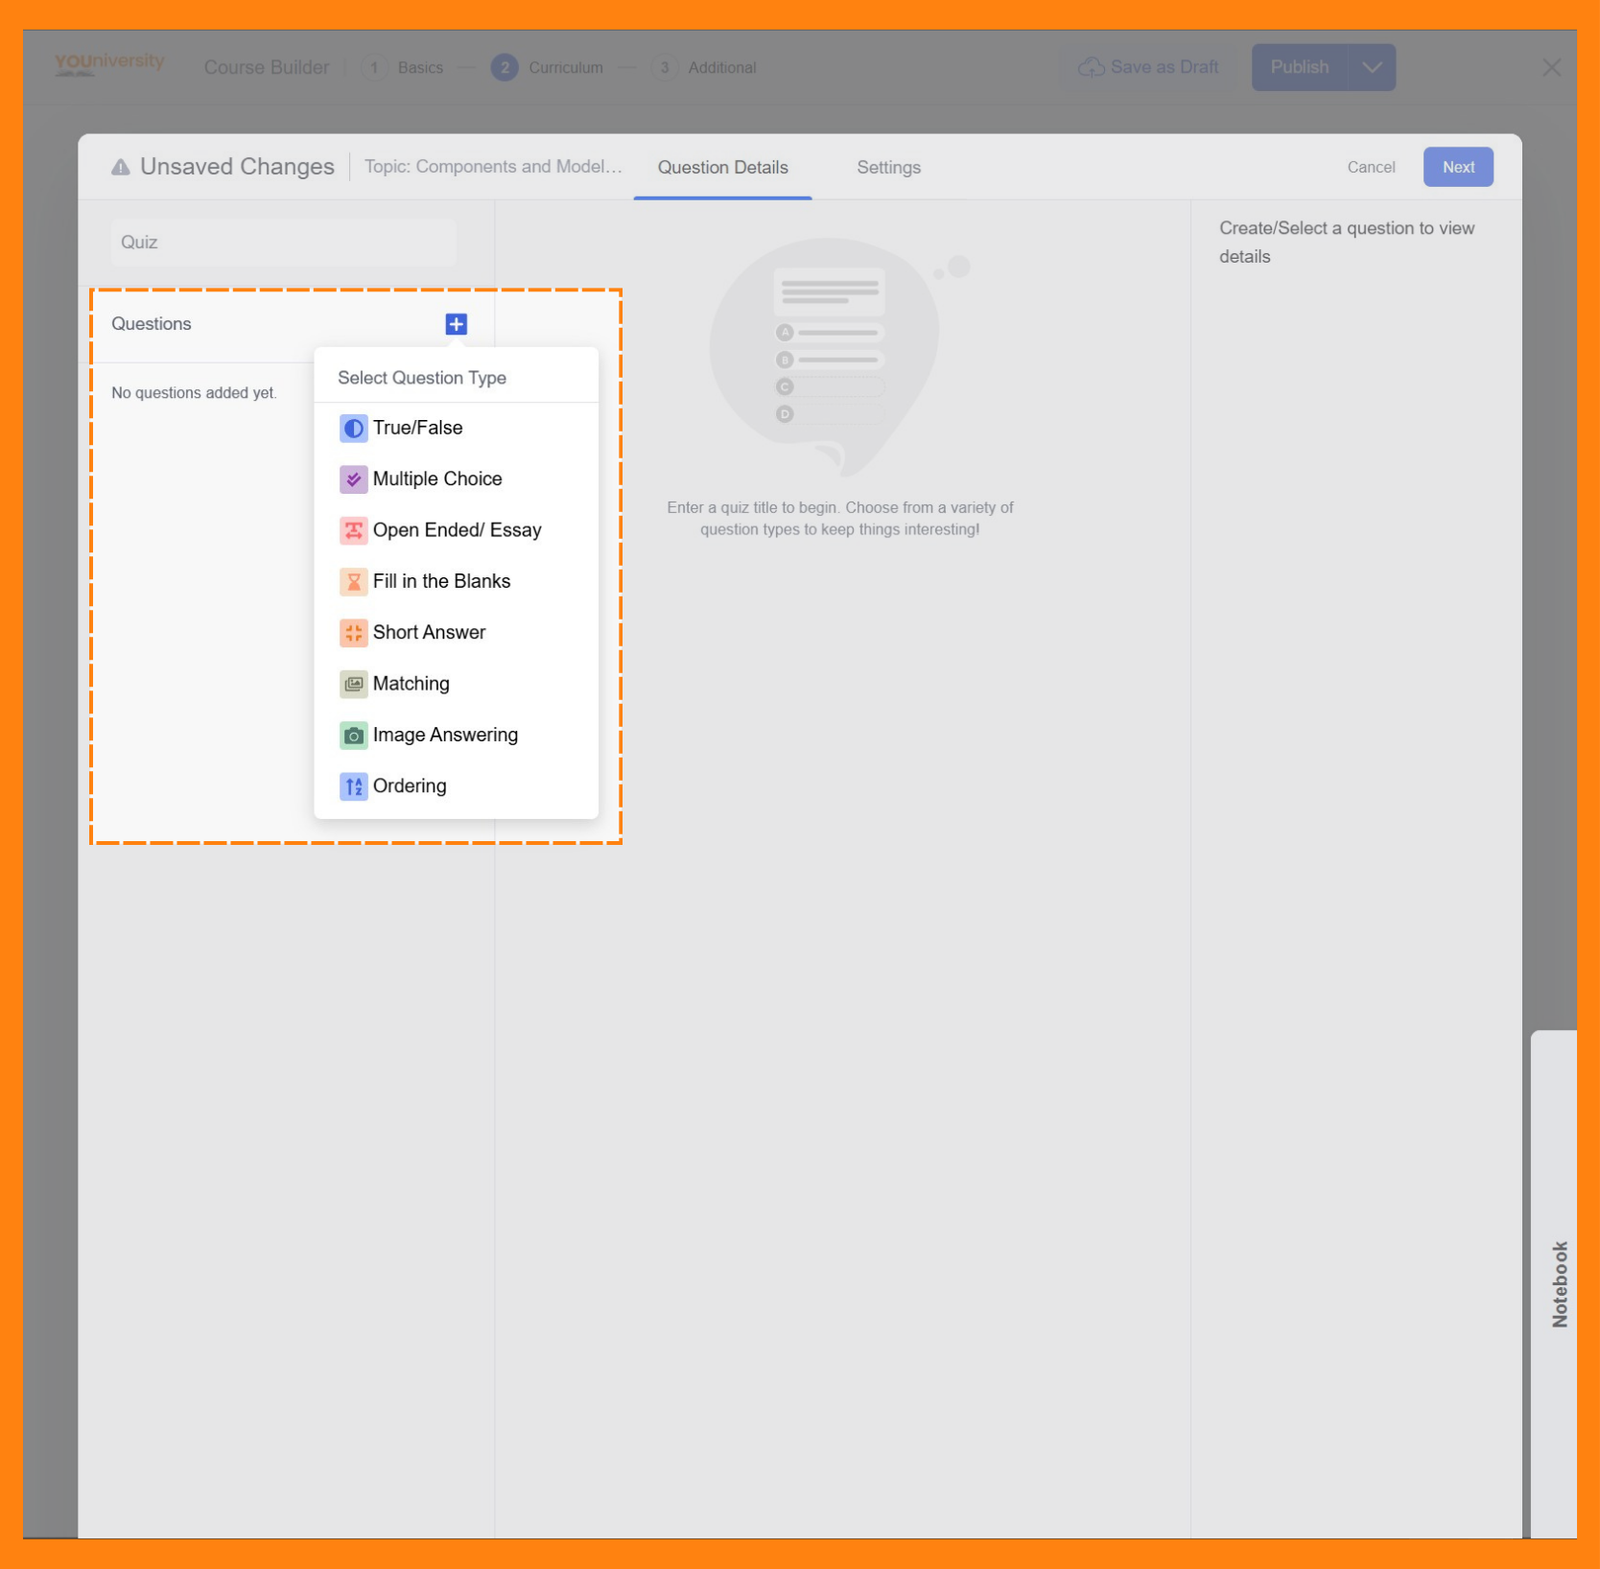
To add quiz questions, click the large blue ‘+‘ button next to the Questions section and select the type of question you wish to add to your course.
In the following section, we’ll explain these question types one by one.
1. True/False
The ‘True/False‘ question type allows you to create simple and direct questions where learners choose between two options: True or False. This question type is ideal for testing basic understanding or verifying factual knowledge.
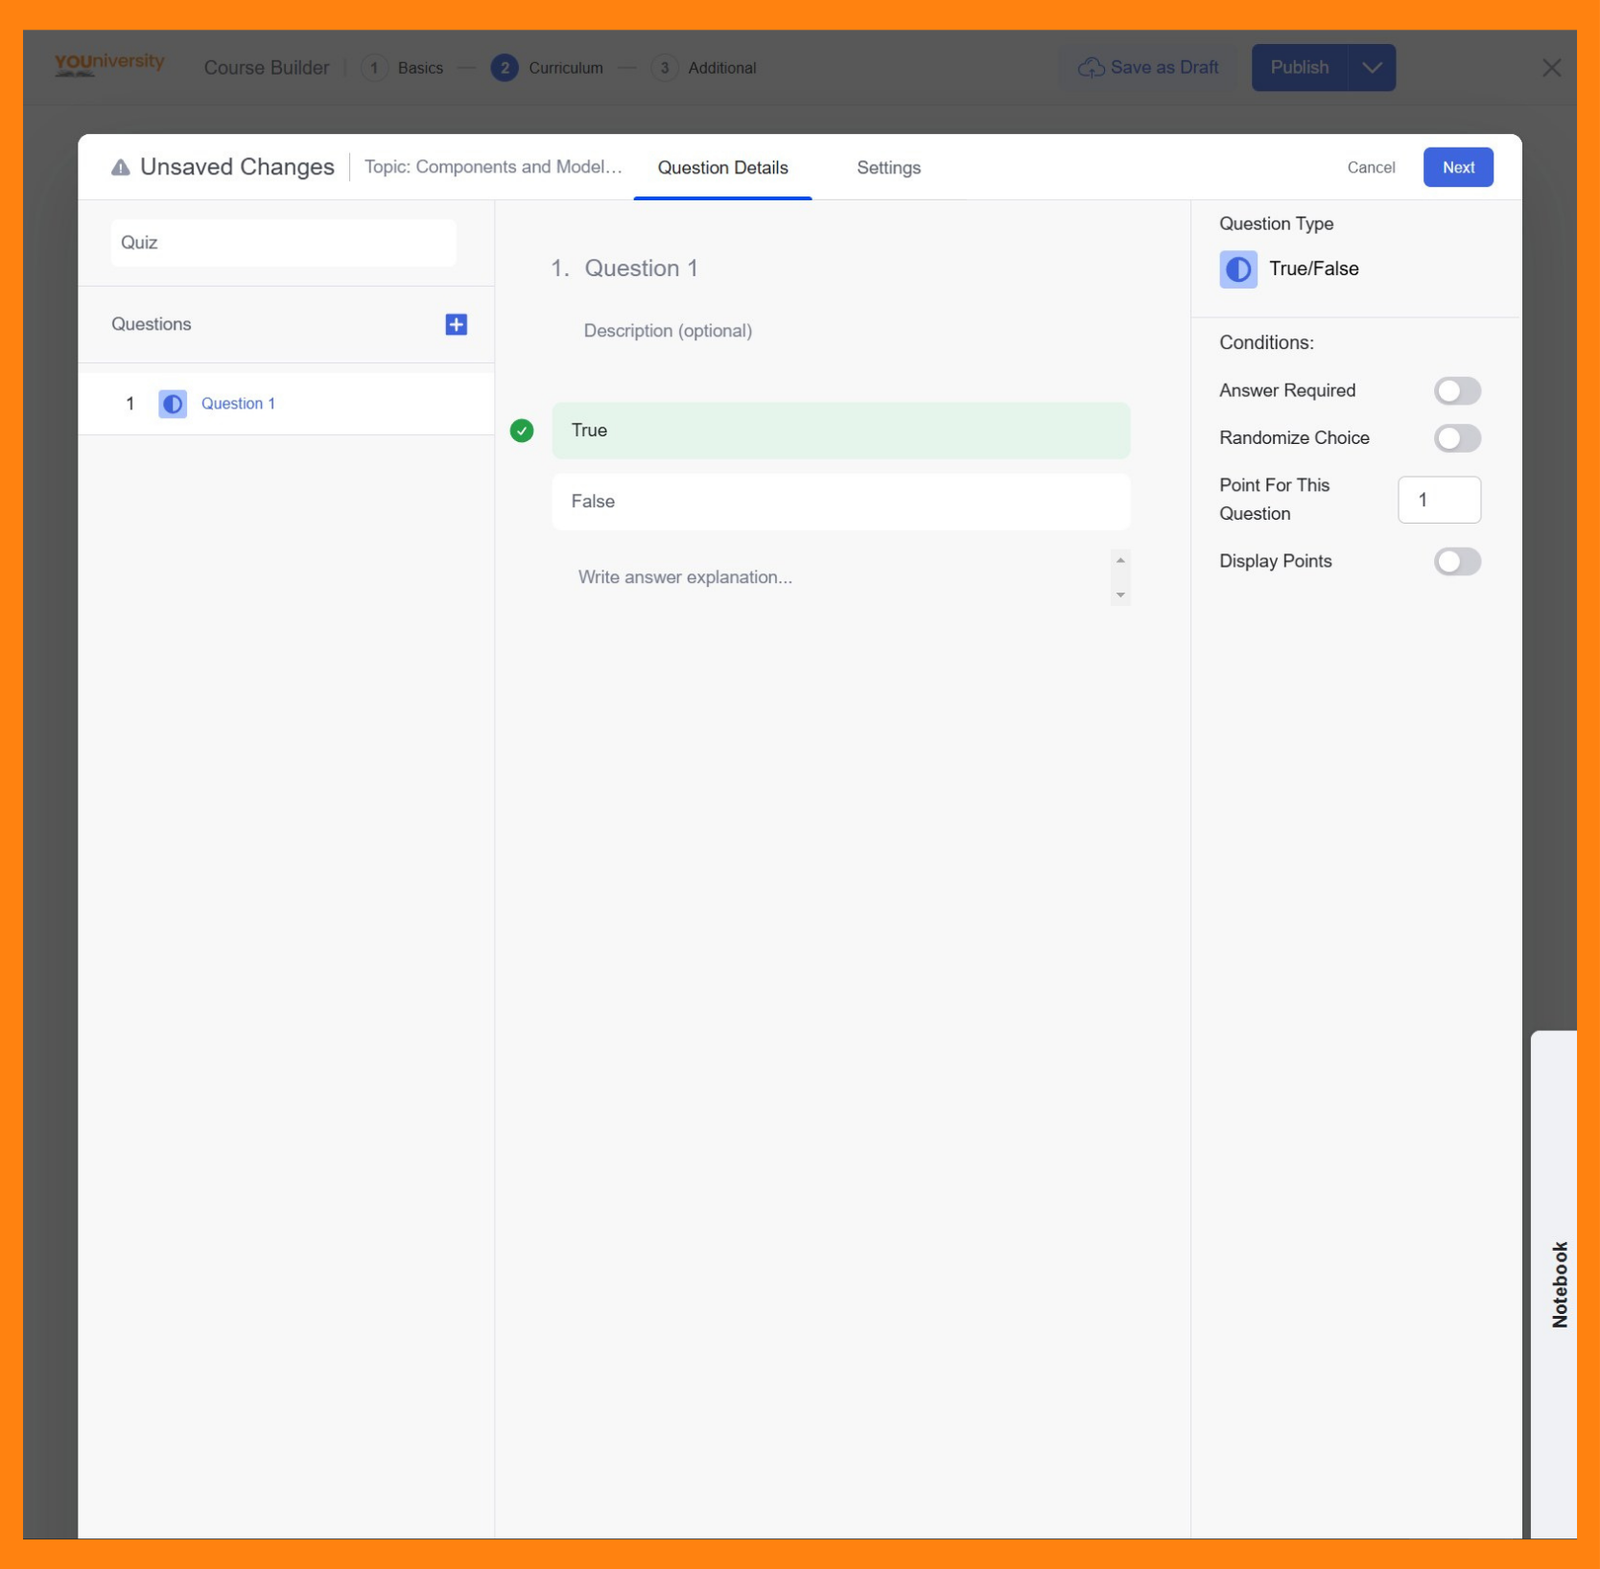
To add a True/False type question, navigate to the quiz editor and select the True/False question type from the options. Then, add the question and a description (optional) to the Question field. After entering the question, specify whether the statement is True or False by clicking on the tick mark to the left of the answer to highlight it in green. This is the answer required by your students.
In the ‘Write answer explanation‘ field you can provide a concise yet informative explanation to help learners understand the correct answers and the reasoning behind them. Students can access the explanation from the Quiz Details page only after they’ve attended the quiz.
Customising Question Conditions
The question types include additional Conditions that allow you to fine-tune the learner experience:
- Answer Required: Enable this question mandatory by using this toggle button.
- Randomize Choice: Toggle this option if you want the order of True and False to appear randomly for each learner.
- Point For This Question: Assign a specific point value to this question. The default is typically set to 1 point.
- Display Points: Choose whether or not to show the point value to the learners.
2. Multiple Choice
The ‘Multiple Choice‘ question type is a versatile and commonly used format in quizzes and assessments. This type allows you to present learners with a question and multiple answer options, from which they must choose the correct one. Multiple Choice questions can have either a single correct answer or multiple correct answers, depending on the condition configuration.
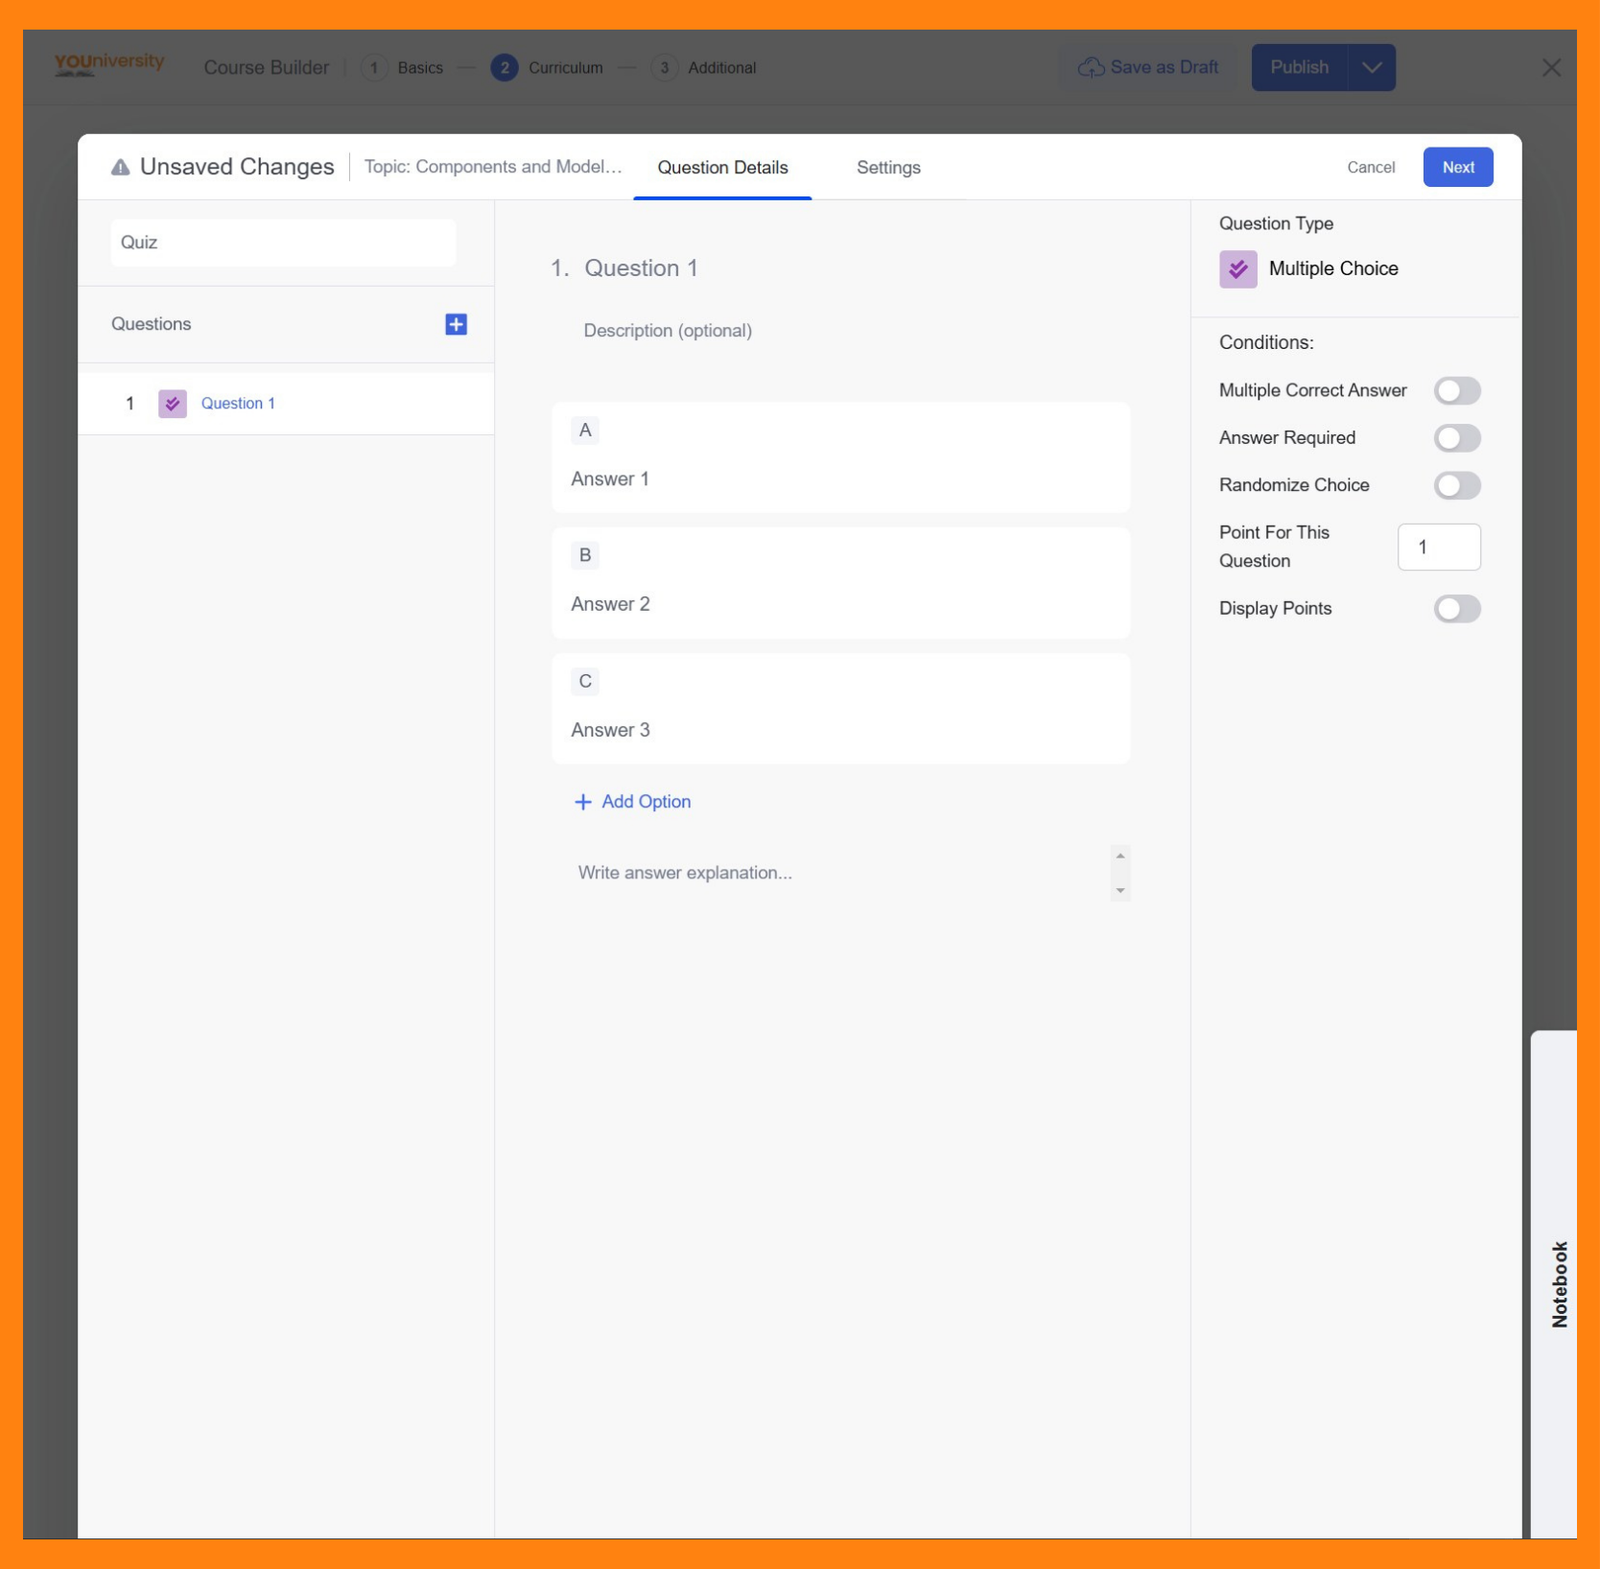
Begin by navigating to the quiz or question editor. Select the Multiple Choice question type from the list of available question formats.
In the Question field, enter your question clearly and concisely. Then, add answer options by clicking the + Add Option button. You can add as many answers as you need, but having too many can confuse your learners. You can also include images with the answers. For optimal visibility, ensure the image resolution is 700×430 pixels.
Finally, indicate the correct answer by selecting the checkbox to the left of the appropriate option answer to highlight it in green.
Enable the Multiple Correct Answer toggle from the Conditions section on the right side to add multiple correct answers. Then, you can choose multiple correct answers by selecting the checkbox to the left of the appropriate option answer to highlight it in green.
3. Open Ended/Essay
The ‘Open-Ended/Essay‘ question type is designed for in-depth, subjective responses where learners can provide detailed answers.
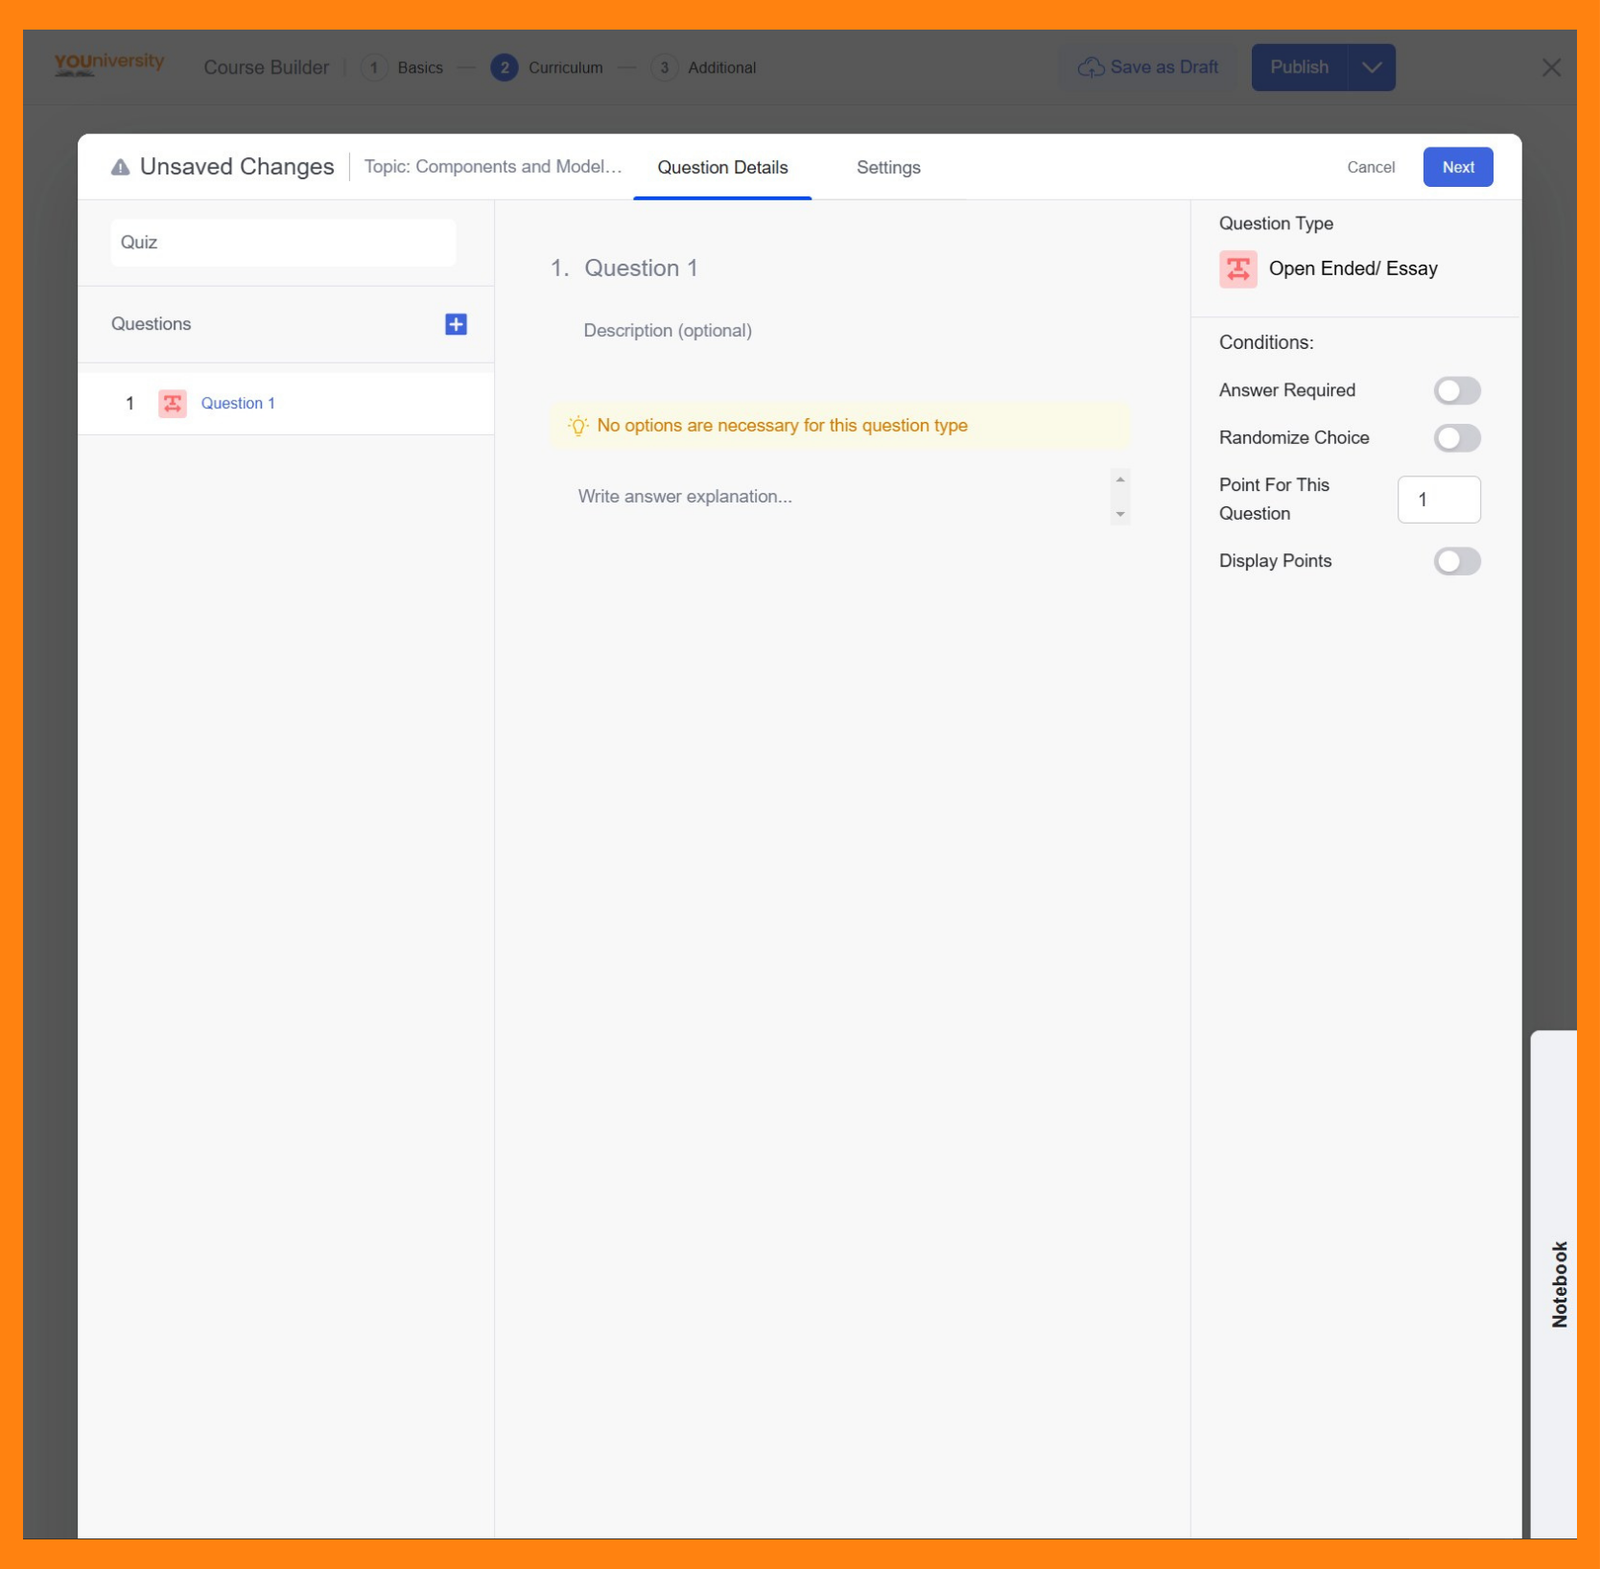
Start by selecting the Open-Ended/Essay question type in the quiz editor. This question type allows learners to input free-form text responses. You only need to add the question title and description; leave the ‘Write answer explanation’ field blank.
You can also set a character limit for the essay. This option is available in the ‘Quiz Settings‘ section.
4. Fill in the Blanks
The ‘Fill in the Blanks‘ question type lets Instructors create quiz questions where learners complete sentences by filling in missing words or phrases.
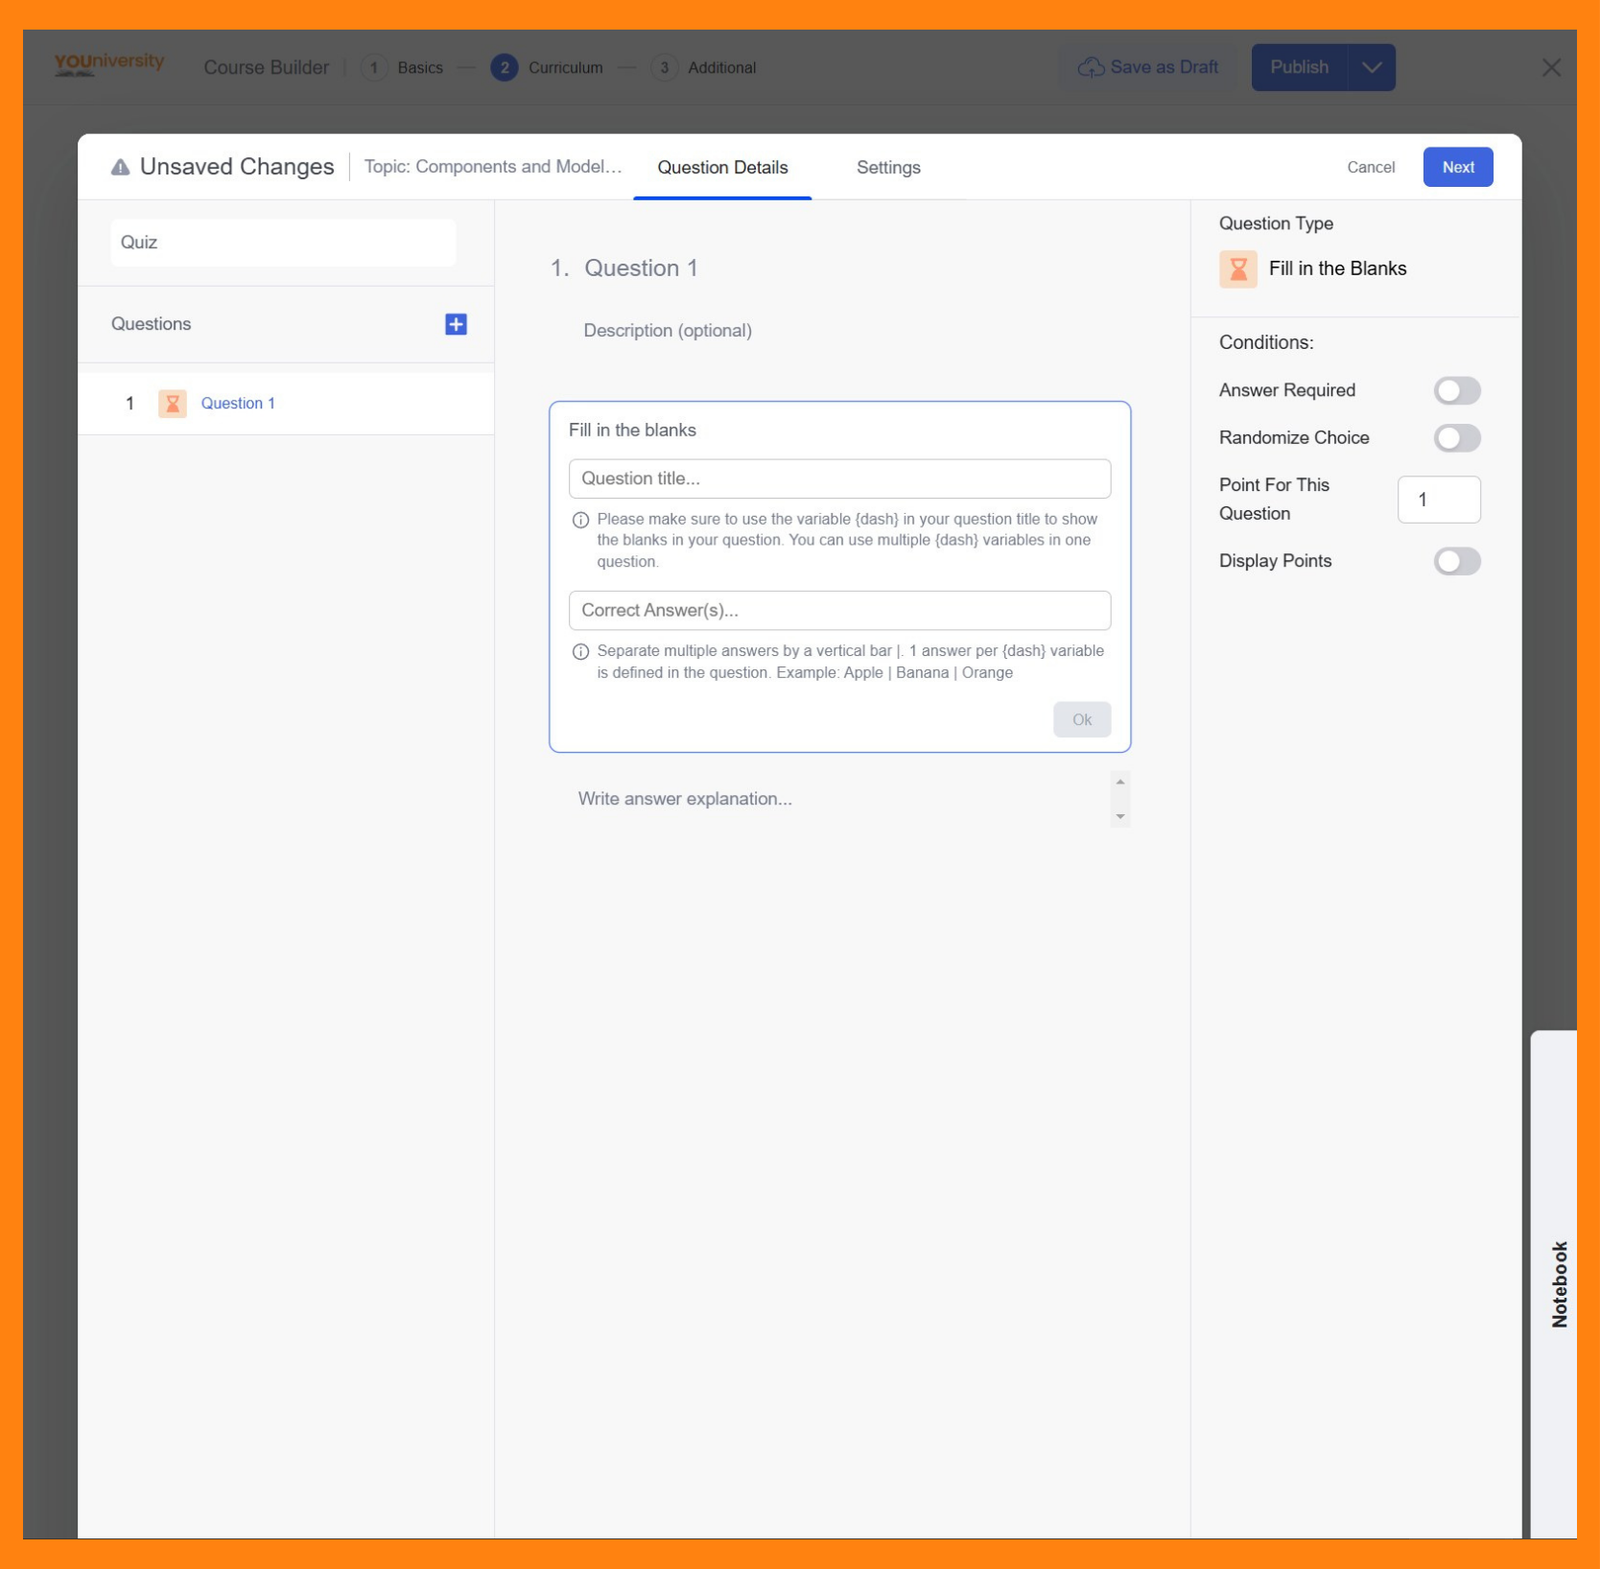
To create this quiz, you have to select the Fill in the Blanks quiz type. There, you can add the title and description of the quiz. Up next, you have to add the question and its answers.
To indicate a blank space where the learner needs to input an answer, the instructor must use the variable {dash}. Below the title field, there is a Correct Answer(s) input box. This is where the correct answers for the blanks are specified.
If there is only one blank in the question, the correct answer is simply written as is. However, if there are multiple blanks, the answers must be listed in the same order as the blanks appear in the question. These answers are separated by a vertical bar (|).
Here’s a sample question: “Water is made up of {dash} and {dash}.” The correct answers are Hydrogen and Oxygen. So, you should enter the answers as “Hydrogen | Oxygen” to mark them correctly.
In the ‘Write answer explanation‘ field you can provide a concise yet informative explanation of the answers.
5. Short Answer
The Short Answer question type allows you to test your students’ knowledge with concise, text-based responses.
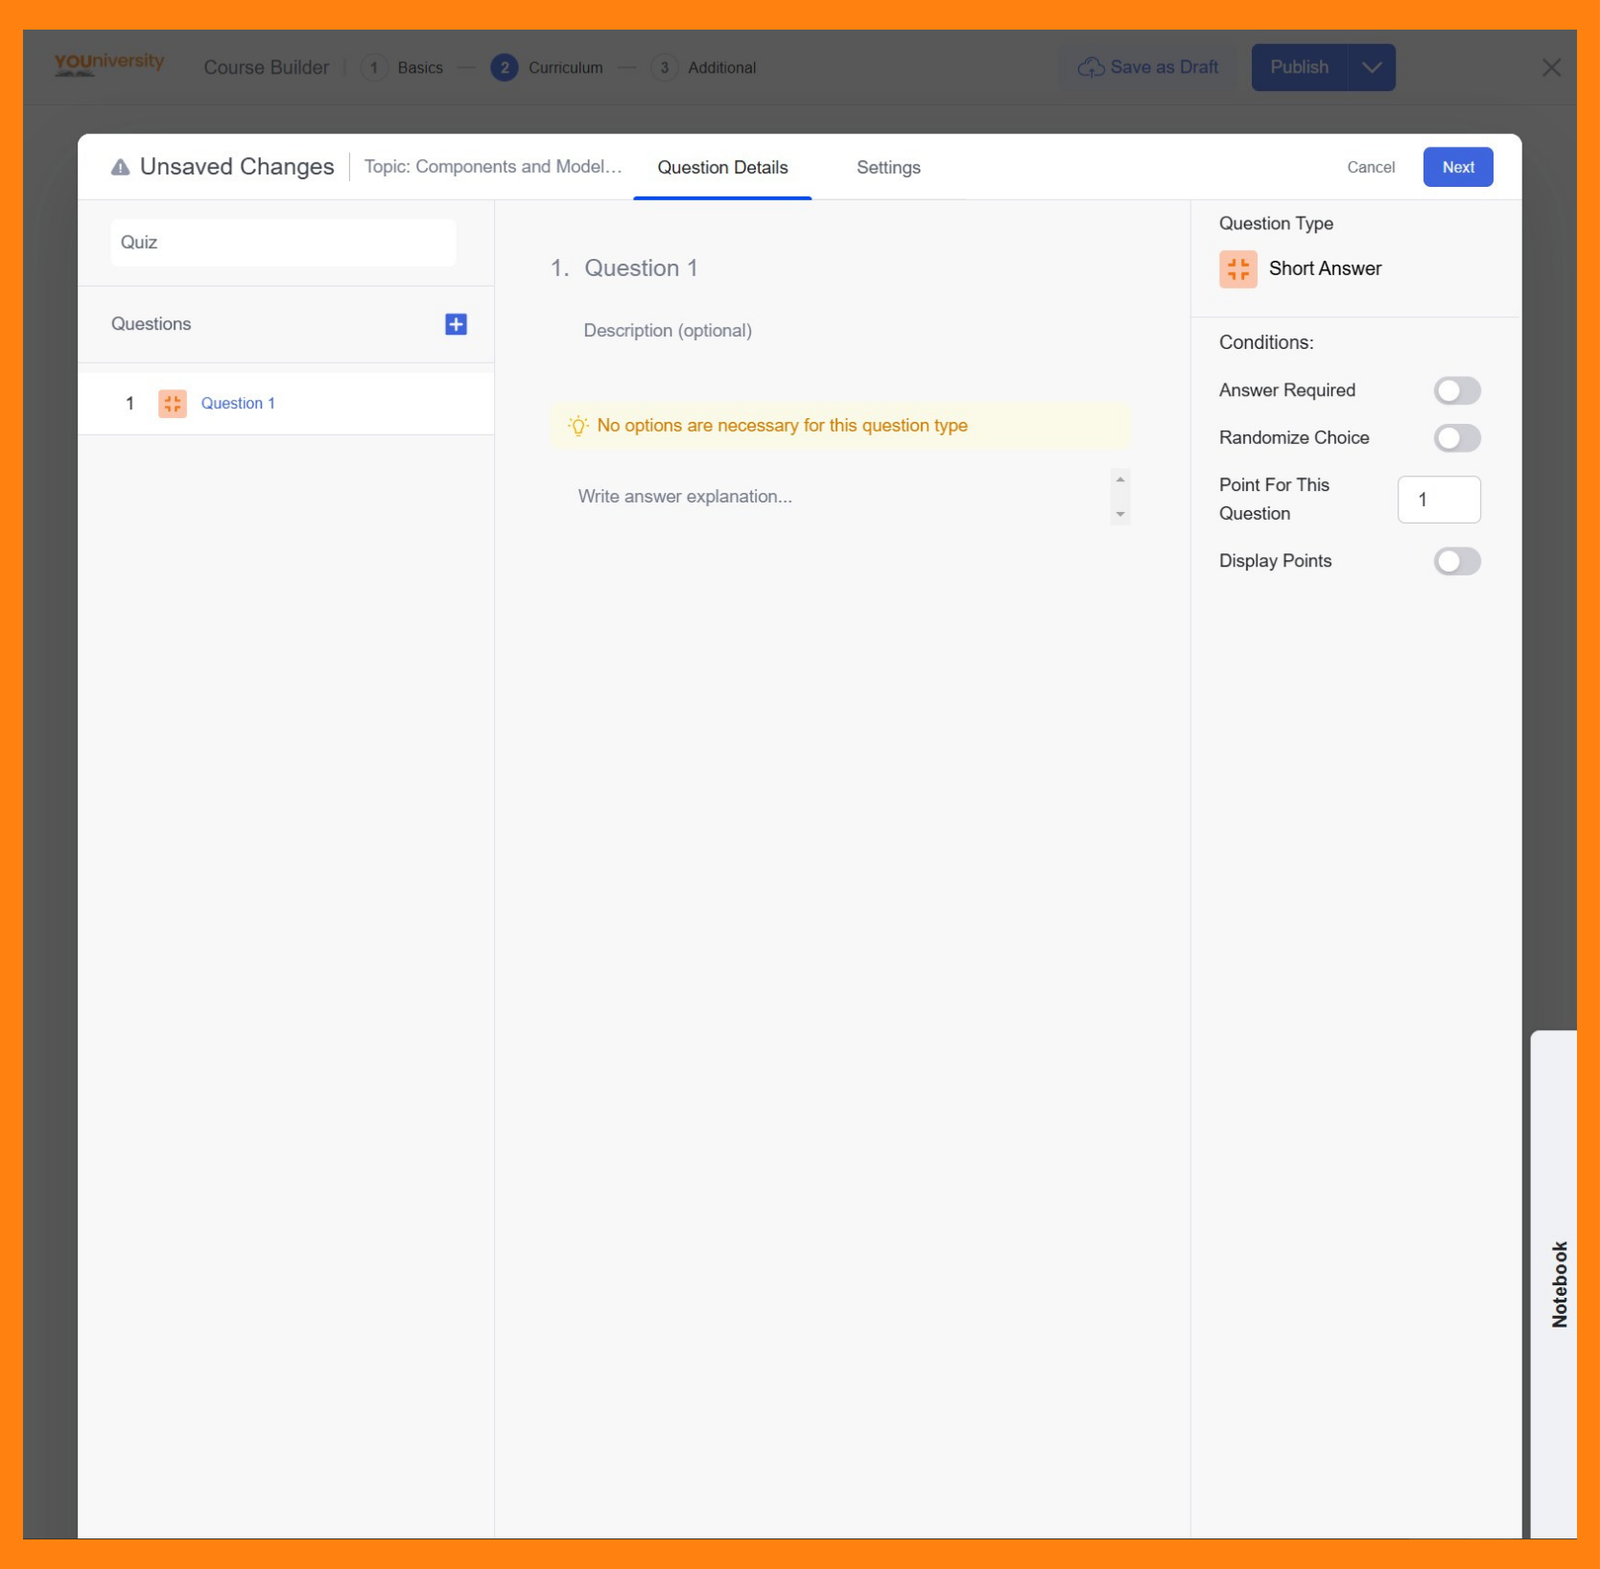
Like the general quizzes, you have to select the Short Answer question type from the list. There, you have to input the question title and description. However, you can also set a character limit for this question type. This option is available in the Quiz settings section.
6. Matching
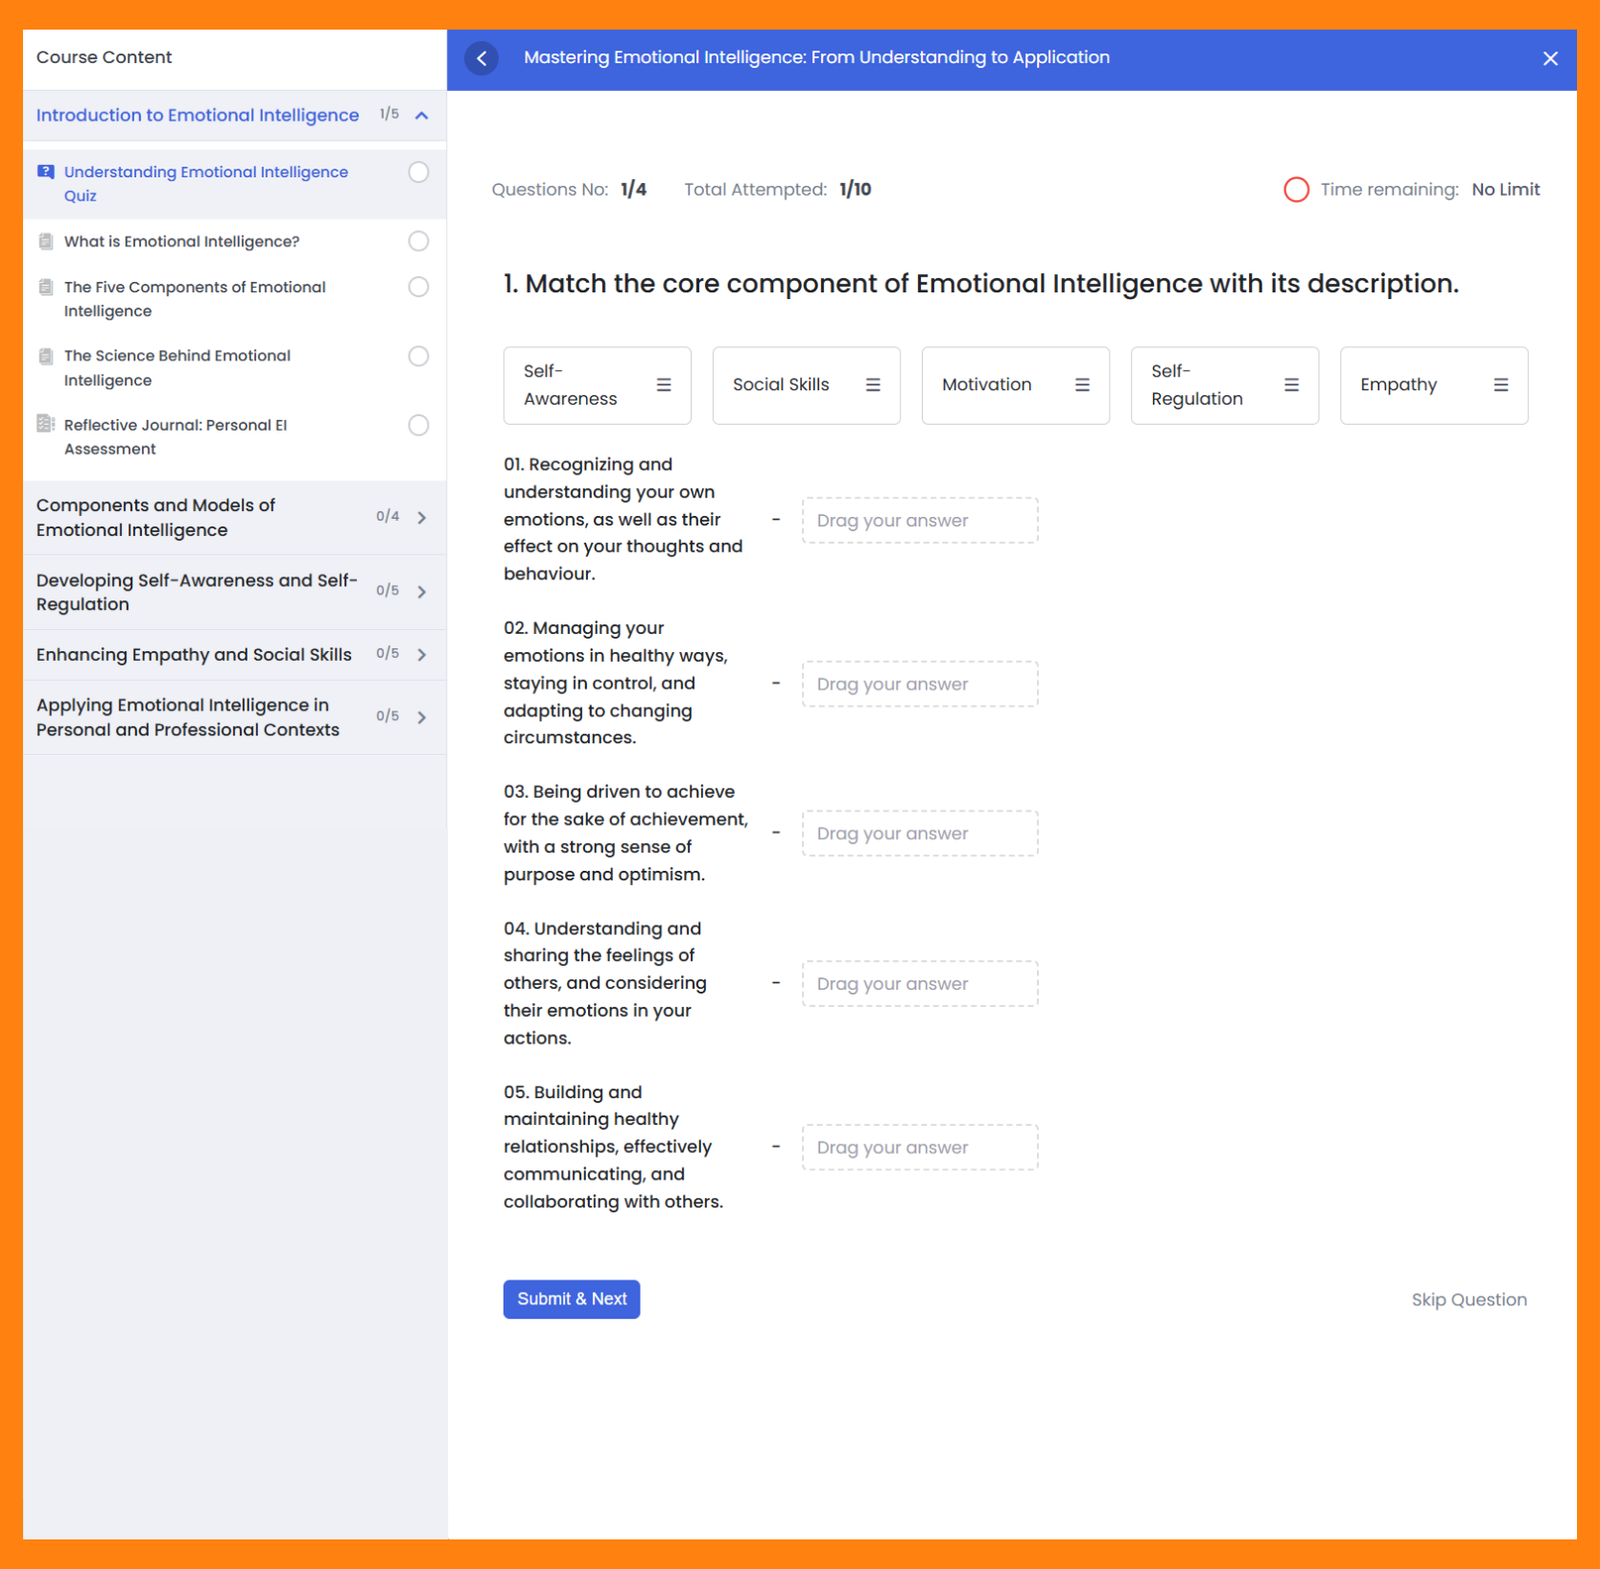
The ‘Matching‘ Quiz type is designed to test students’ ability to pair related items from two separate lists. In a Matching quiz, you provide two sets of items—typically, one list of terms or questions and another list of corresponding answers or definitions. Students need to connect pairings between items in the two lists by dragging the options.
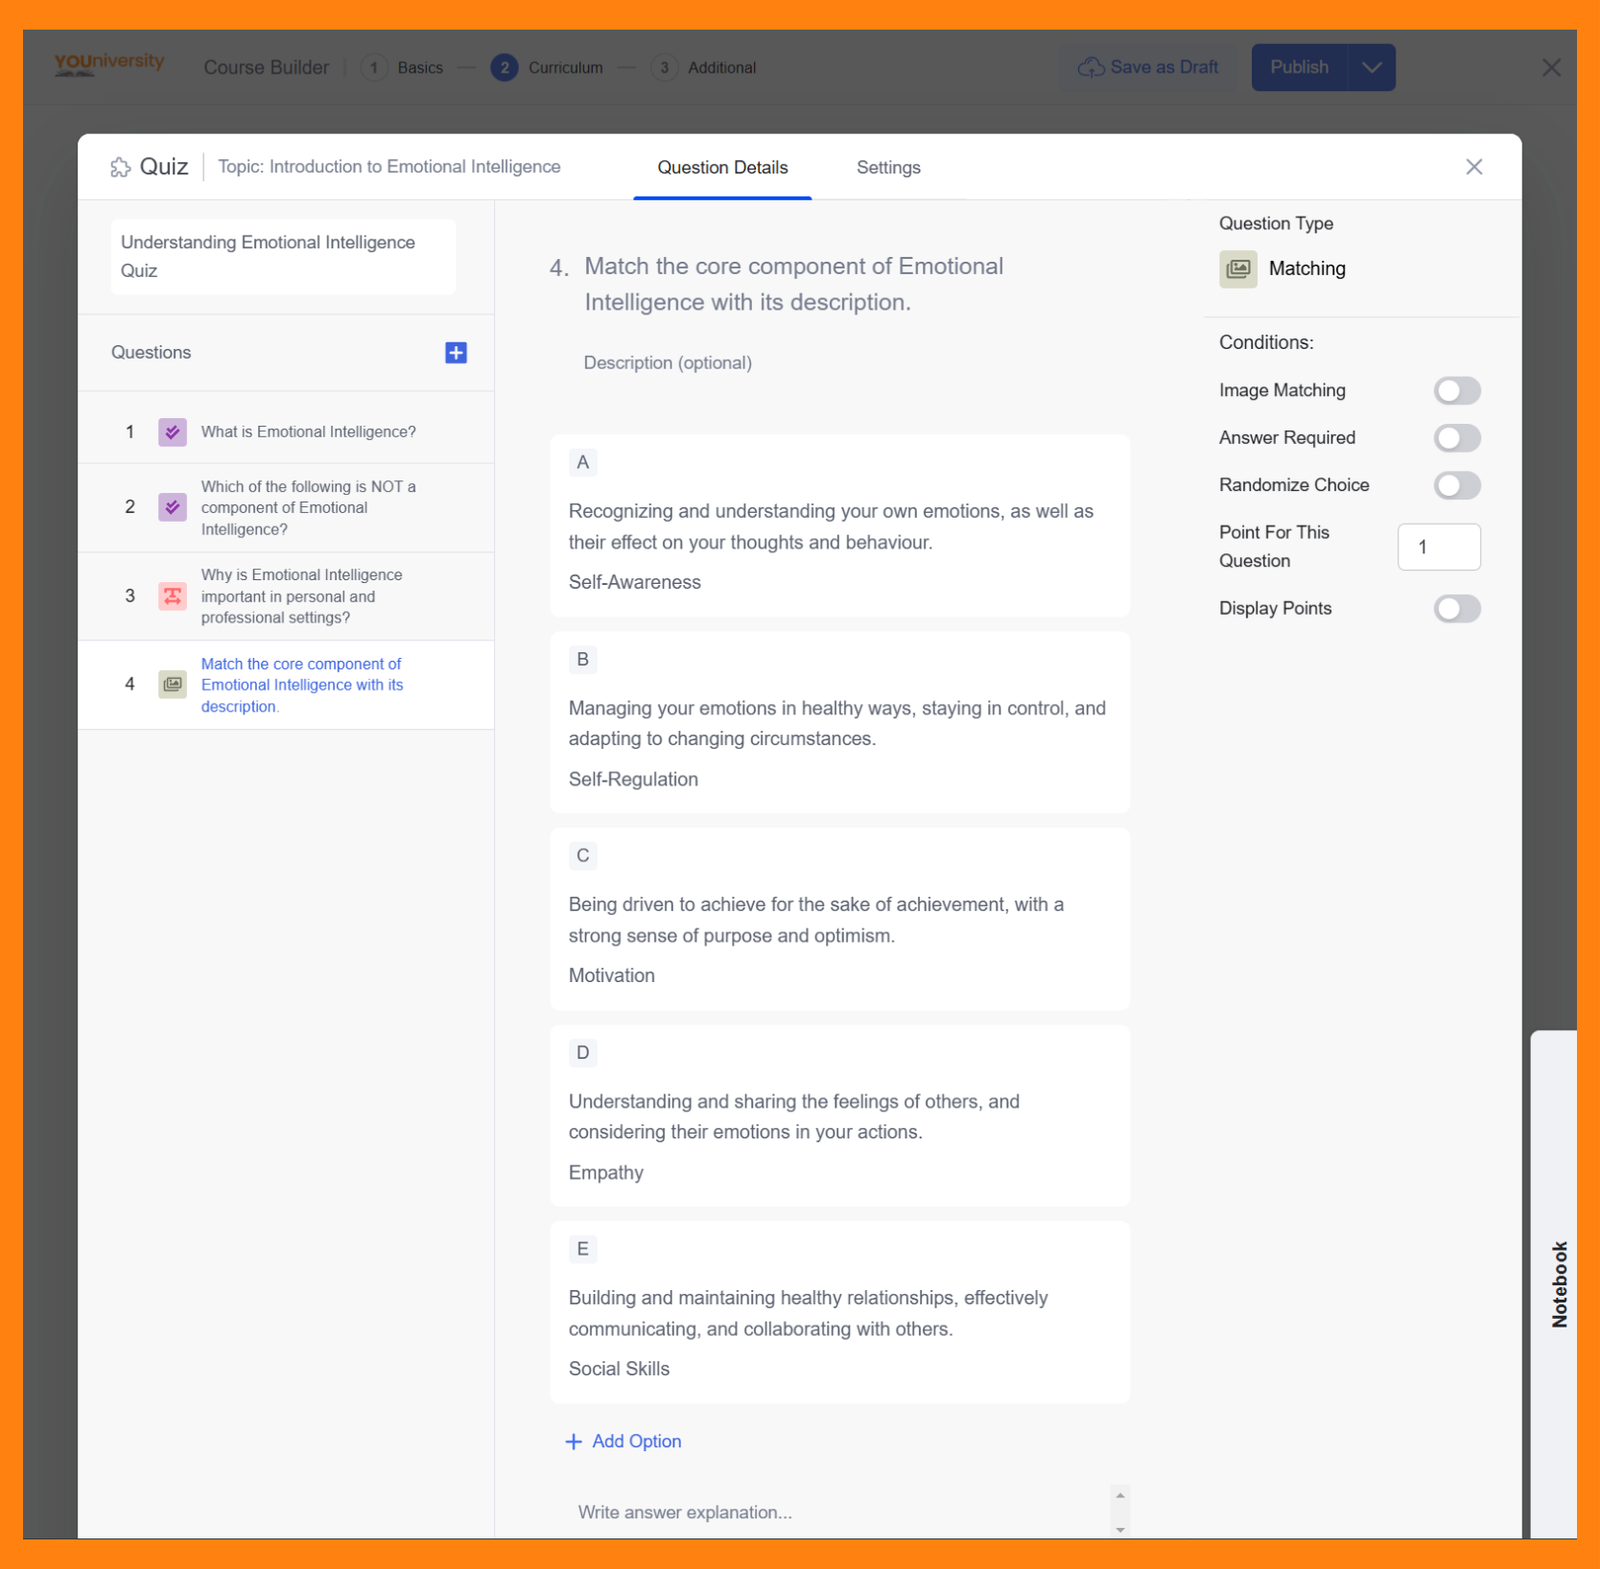
Here’s how the Matching quiz will appear to students:
You can also add images in the options by enabling the Image Matching option from the right sidebar.
7. Image Answering
Image Answering allows you to create interactive questions where students select or identify answers associated with images. This type of question is ideal for visual-based assessments, such as identifying objects, locations, or matching visual content with text descriptions.
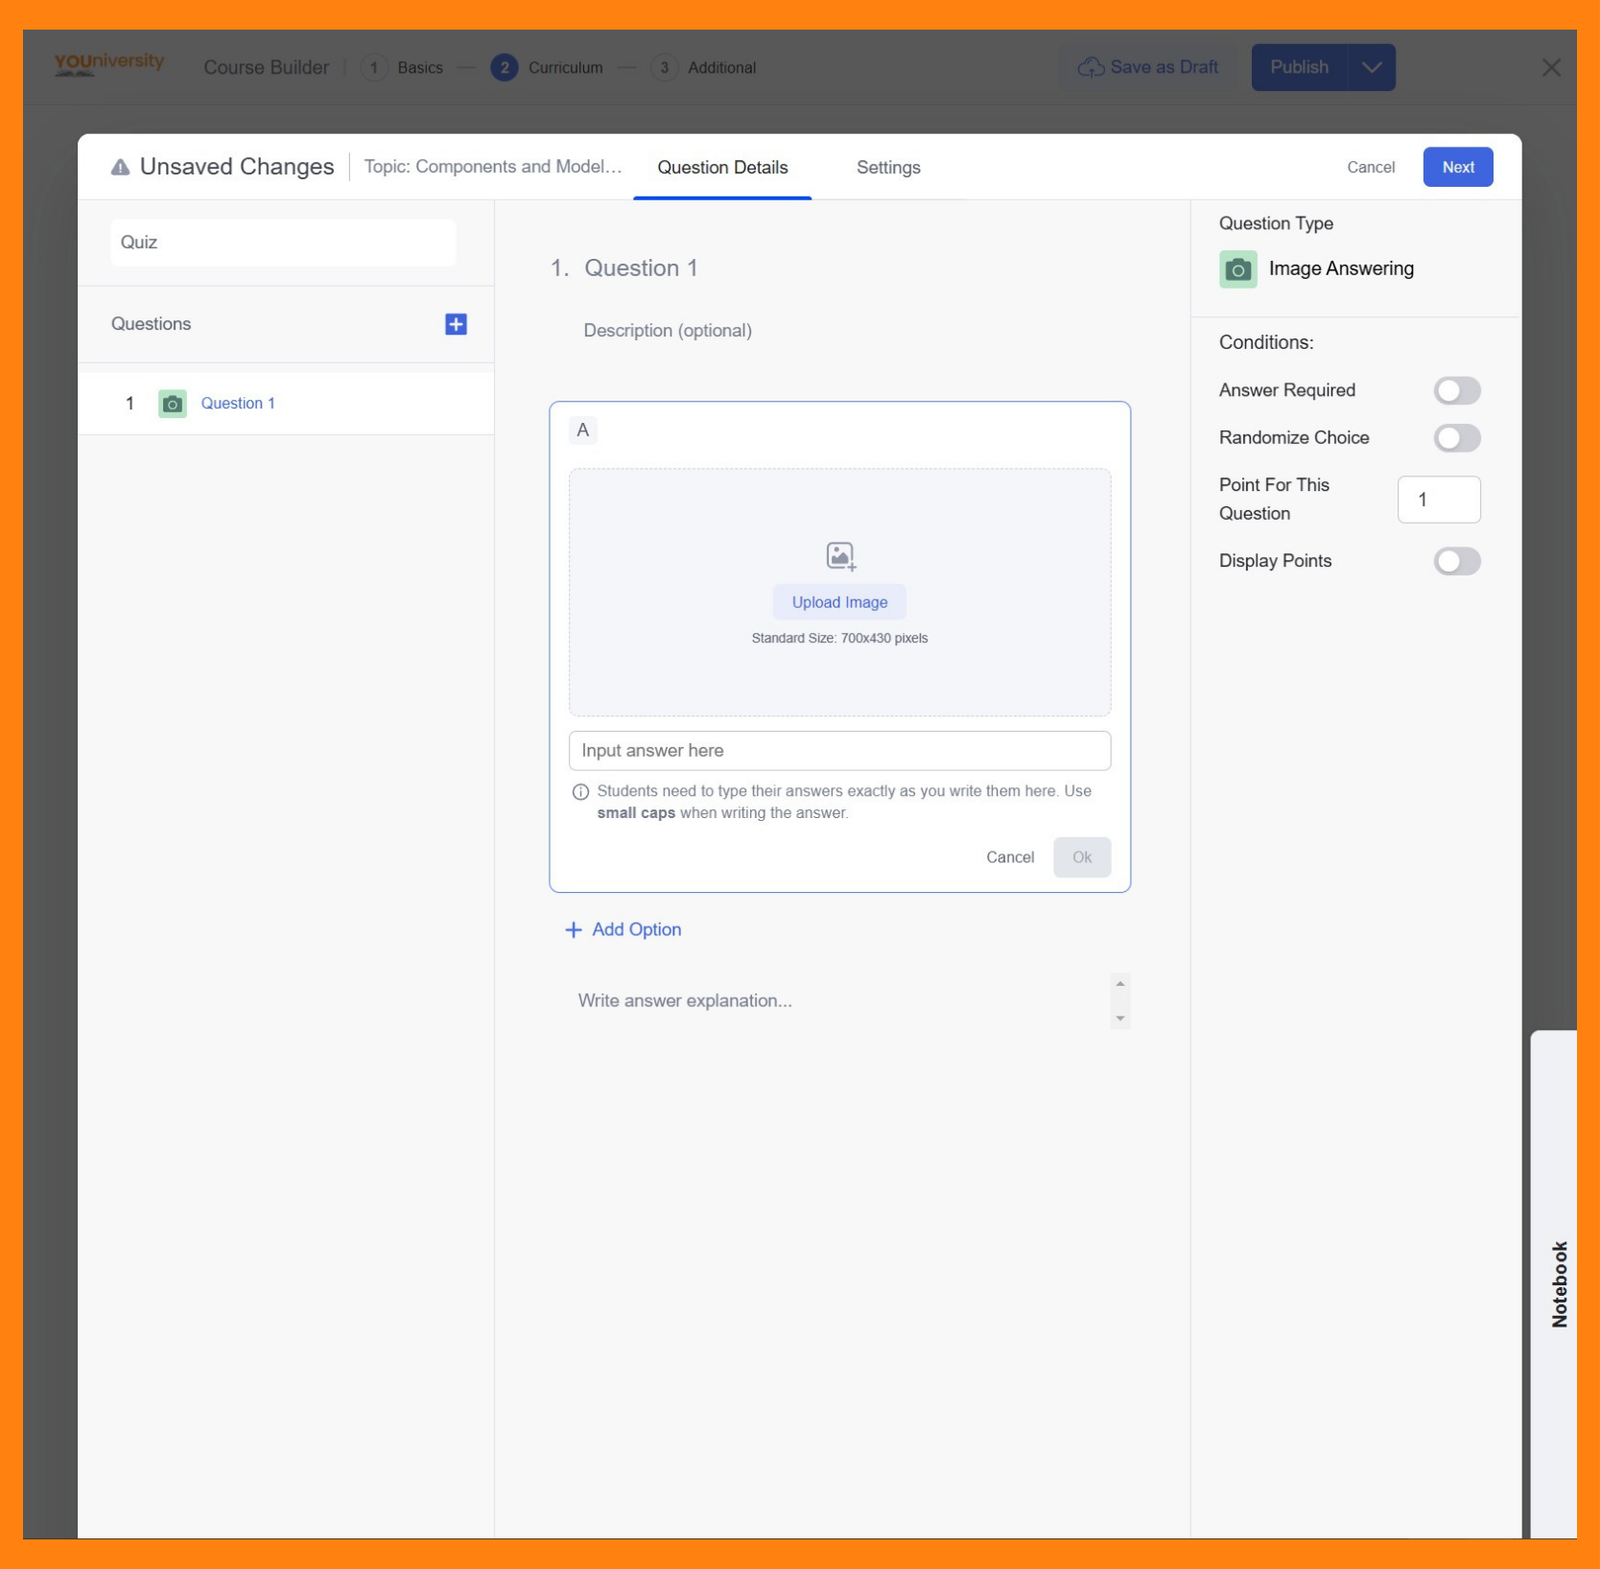
You can start by entering the question title in the ‘Question’ field. Optionally, you can include a description to provide additional context or instructions for the learners.
After that, click on the ‘Upload Image‘ button to upload an image for the question. For optimal visibility, ensure the image resolution is 700×430 pixels. Below the image field, use the Write option text box to add a description or label that corresponds to the image.
To include more answer options, click the + Add Option button. For each option, repeat the process of uploading an image and providing a label or description.
Once you’ve added all the necessary images and options, click the Ok button to confirm the options. Then, click the Save button at the top-right corner to finalize your question.
You can also provide an explanation for the correct answer in the ‘Write answer explanation‘ field. This helps learners understand the reasoning behind the correct response after the quiz.
8. Ordering
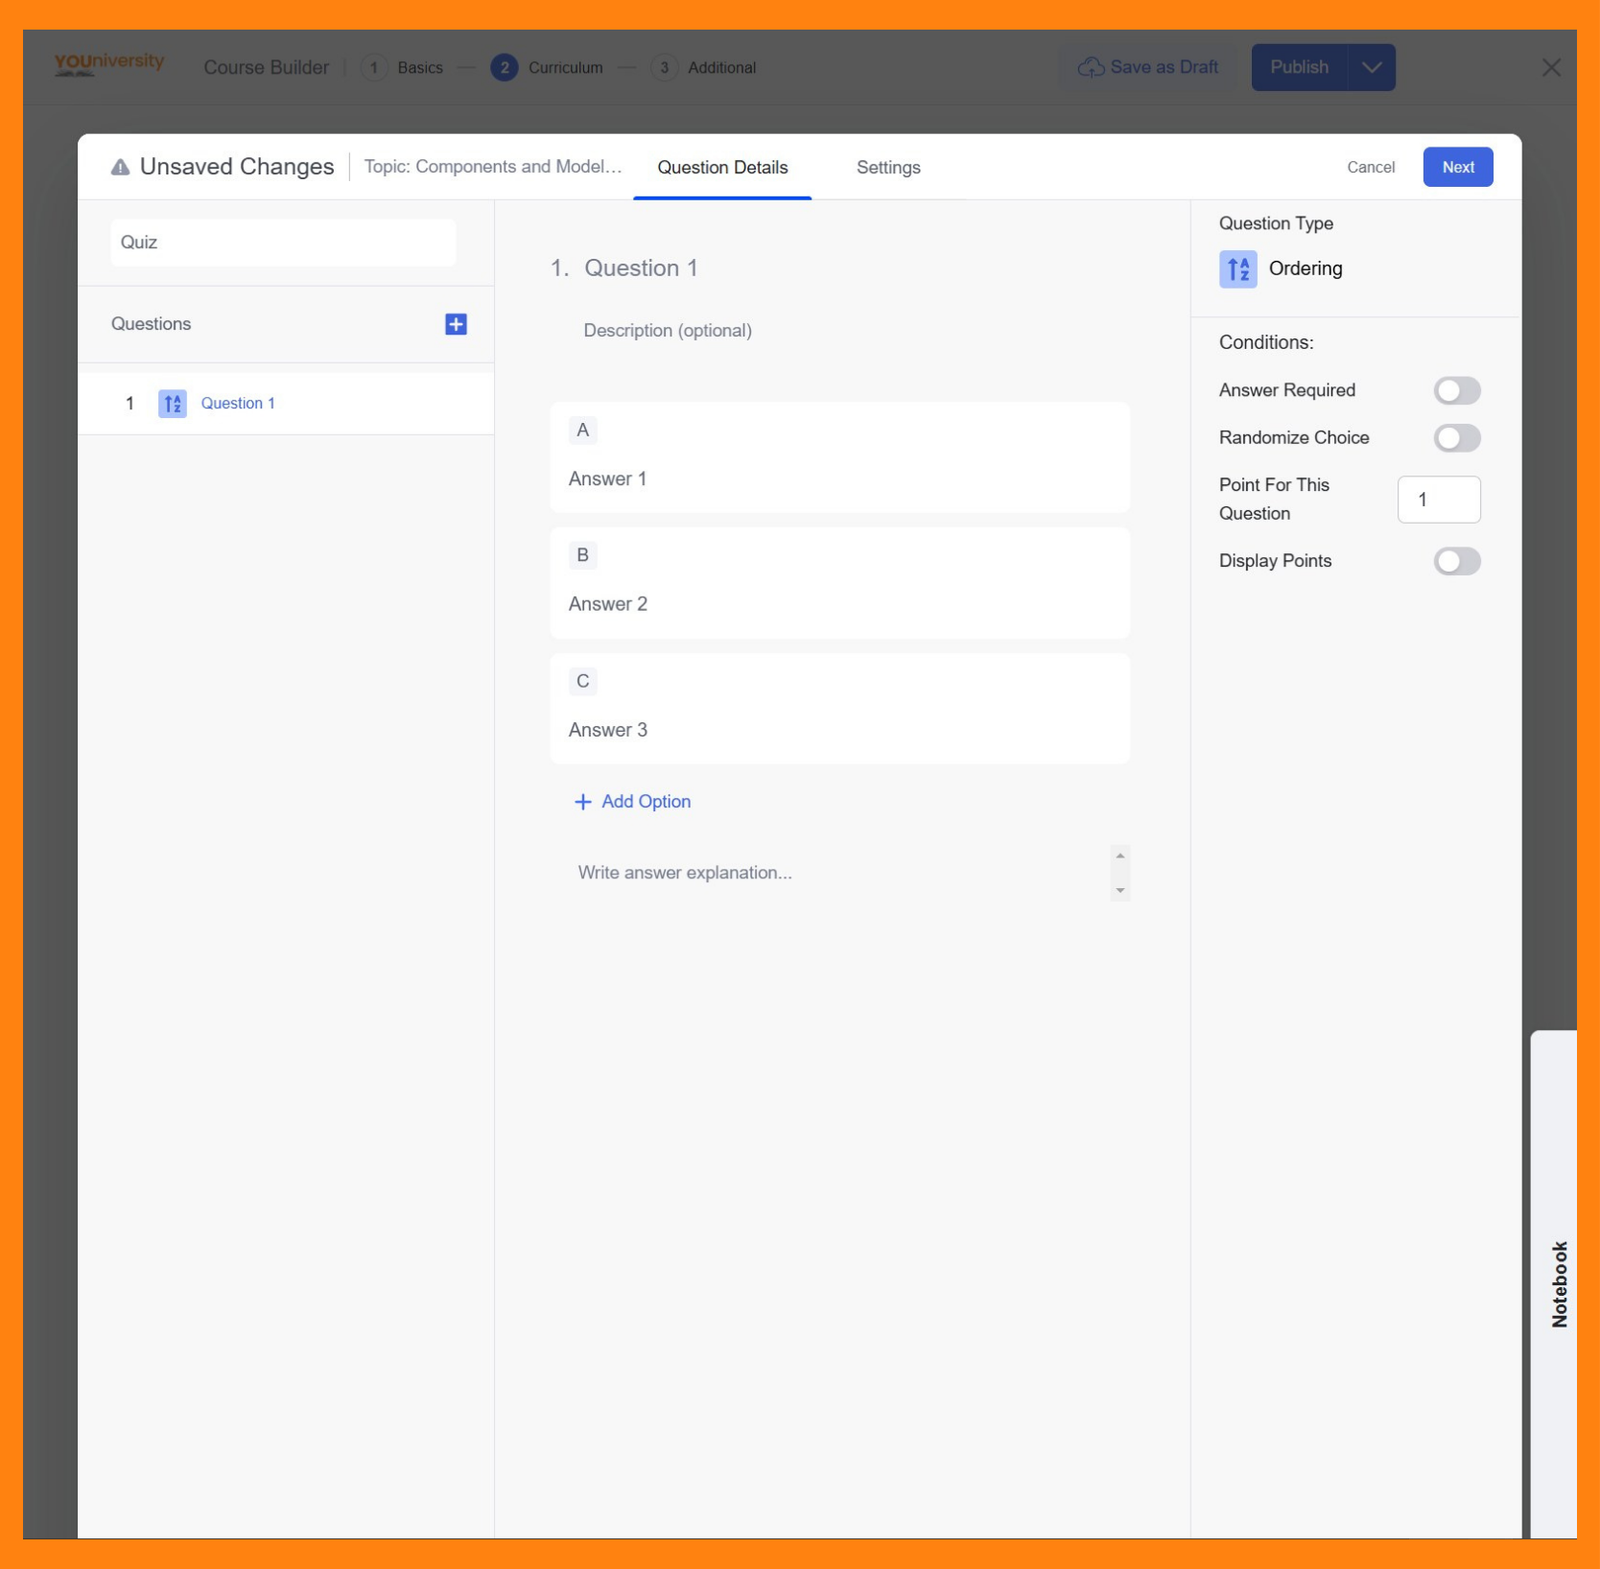
Set an ordering question where students have to reorder the given text, images, or both in the correct sequence to obtain marks.
Quiz Settings
The Quiz Settings section in YOUniversity allows you to customize various aspects of a quiz to suit your course requirements.
Basic Settings
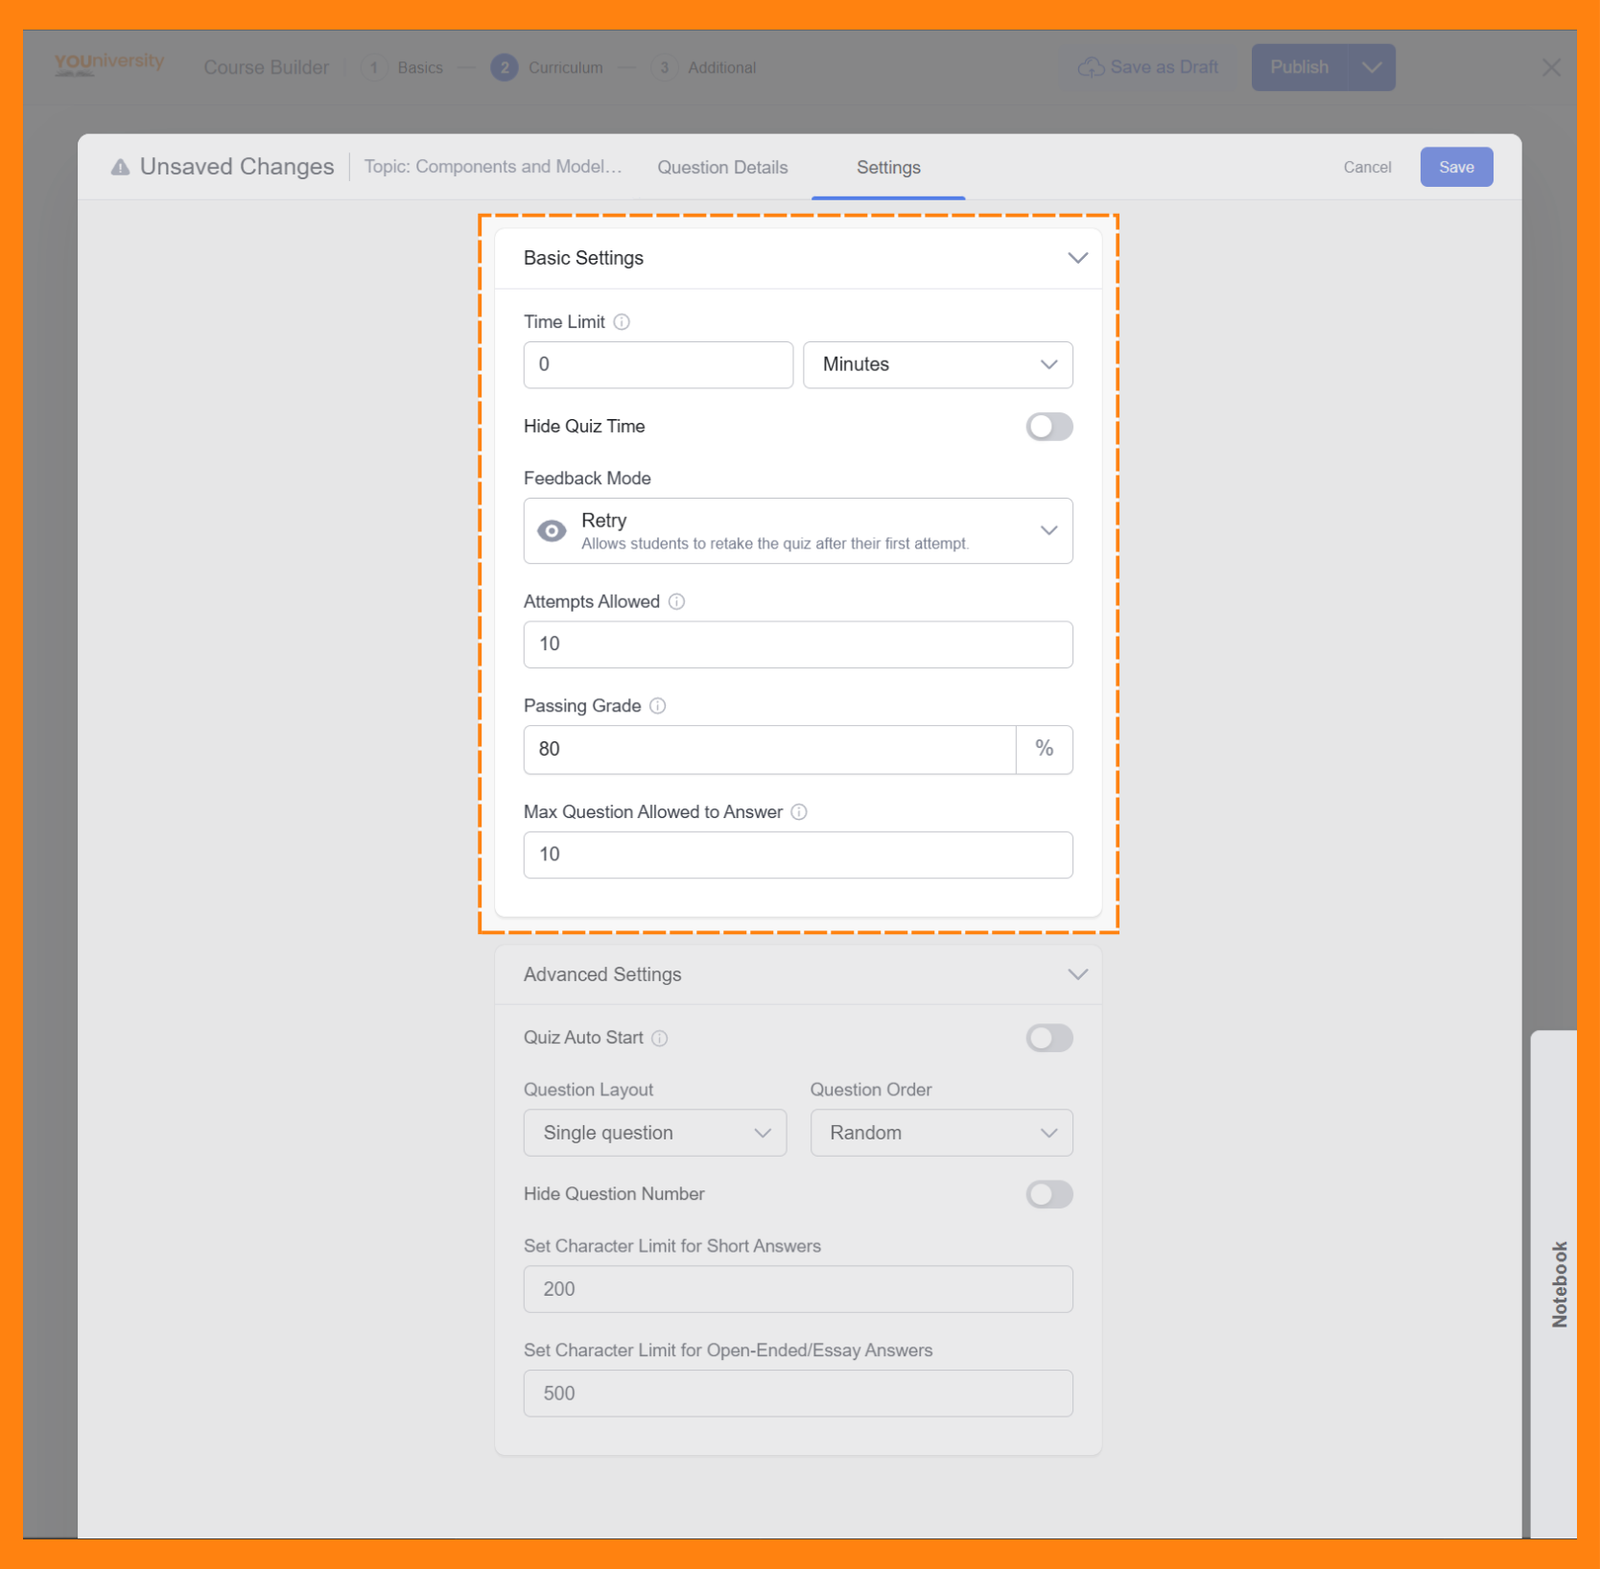
Here’s a detailed explanation of each option:
Time Limit: Set a time limit in seconds, minutes, hours, days, and weeks. Use 0 for no time limit. For example, if you set the limit to 30 minutes, students must finish the quiz within 30 minutes.
Hide Quiz Time: Use this toggle to hide the timer from students during the quiz.
Feedback Mode: The Feedback mode lets you decide how you want to provide your students with feedback after they are done taking the quiz. There are three options to choose from:
- Default: Answers are displayed after the whole quiz is finished.
- Reveal Mode: Answers are shown after the attempt.
- Retry Mode: Reattempt the quiz any number of times. You can define the number of times students can repeat a quiz using the Attempts Allowed setting.
Attempts Allowed: Set the maximum number of quiz attempts (default is 1). Set the value 0 (zero) if you want to offer unlimited attempts.
Passing Grade: Define the minimum score required to pass the quiz. You can set the passing grade only in the percentage unit.
Max Questions Allowed: This feature allows you to randomize the questions in a quiz. The function becomes clearer with an example.
Let’s consider a quiz with 50 questions. If you set the “Max Questions Allowed” to 50, the student will need to answer all 50 questions to complete the quiz. However, if you set it to 10, the student will only be required to answer 10 random questions out of the 50, and each student will receive a unique set of questions. No two students will get the same selection.
Prerequisites: Add prerequisite lessons, quizzes, etc, that students need to complete before attempting the quiz.
Advanced Settings
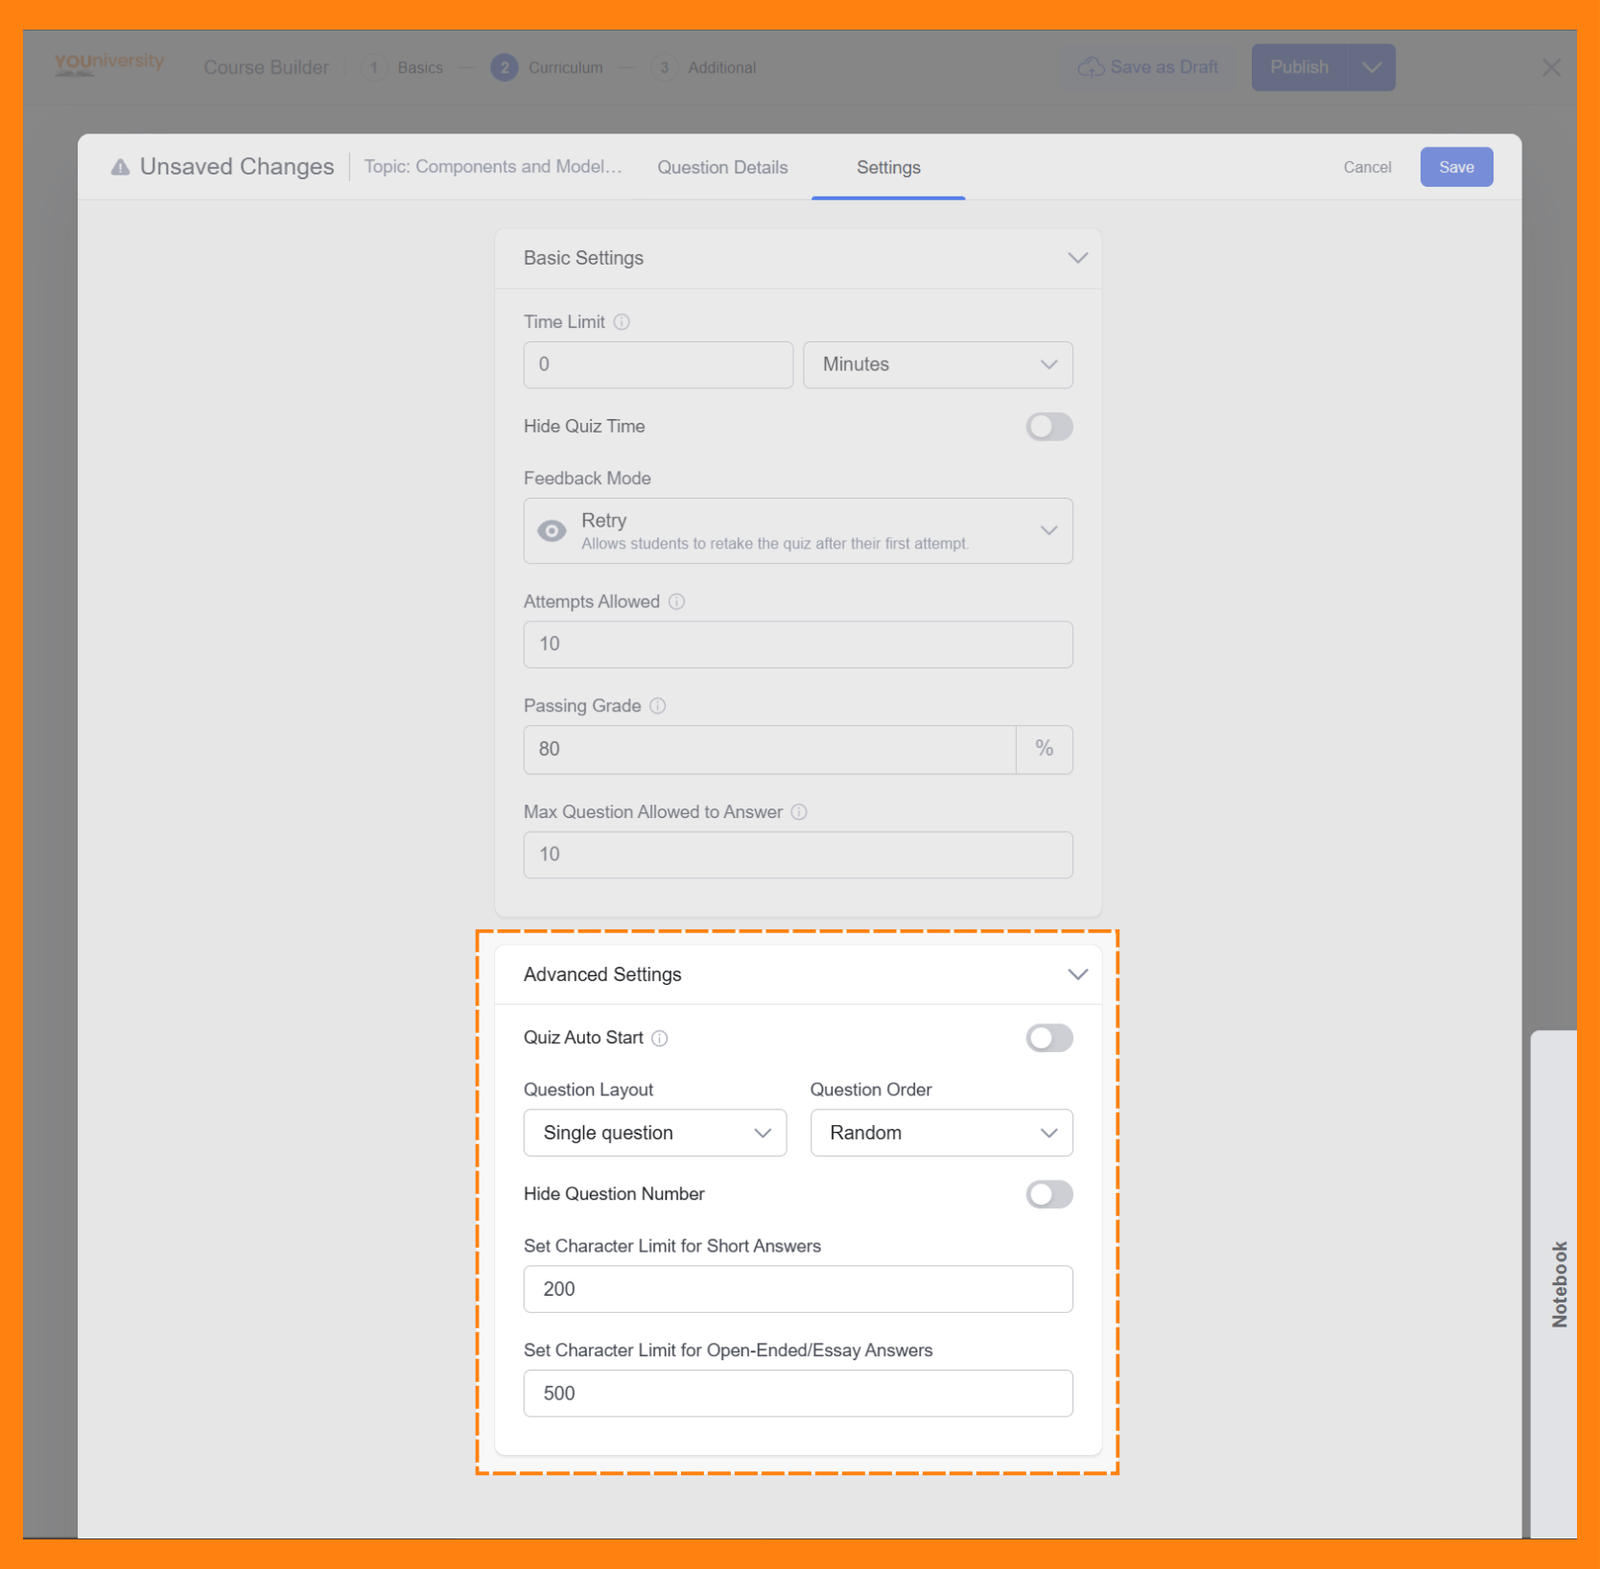
Here’s a detailed explanation of each option:
- Quiz Auto Start: Enable this to make the quiz start immediately after the page is loaded.
- Question Layout: Set the layout for the quiz page. Options include Single Question, Pagination, and Question below the other.
- Hide Question Number: Enable to hide the question number during the quiz.
- Set Character Limit for Short Answers: Select the character limit for short answers.
- Set Character Limit for Open-Ended/Essay Answers: Select the character limit for open-ended/essay question answers.
Remember, the most important aspect of content creation is your passion and dedication. As you continue to create and improve, your skills will evolve, and your content will shine. Keep honing your craft, stay open to learning, and enjoy the journey. Your creativity knows no bounds, and your audience is waiting to be inspired by your exceptional content.
If you have any questions about teaching on YOUniversity, check out our FAQ section. We’re always here to support you on your journey to becoming a successful instructor! Happy teaching!